Rust로 작성해 보는 컴퓨터 구조 (10) - 전가산기

전가산기(Full Adder)는 이름 그대로 전체 기능이 다 있는 가산기다. 반가산기에서 빠진 기능인 자리 올림수를 받아서 처리할 수 있는 가산기 회로다.
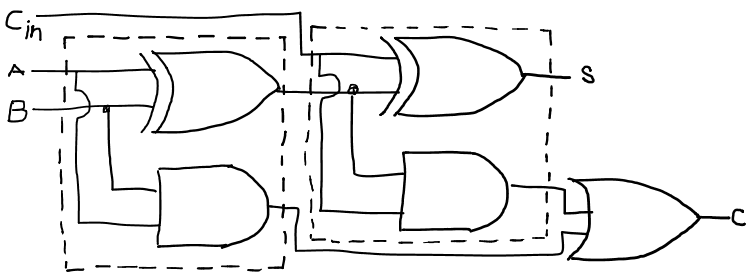
위 그림이 전가산기의 게이트 구성이다. 입력 Cin이 자리 올림수를 받는 핀이다. 위 그림에 네모로 표시한 것이 두 개 보인다. 각 네모 안에 게이트 구성은 같다. 그렇다. 네모로 표시한 것이 바로 반가산기다. 전가산기는 반가산기 두 개를 연결한 회로다.
| 입력 A | 입력 B | 입력 Cin | 출력 C | 출력 S |
|---|---|---|---|---|
| 0 | 0 | 0 | 0 | 0 |
| 0 | 0 | 1 | 0 | 1 |
| 0 | 1 | 0 | 0 | 1 |
| 0 | 1 | 1 | 1 | 0 |
| 1 | 0 | 0 | 0 | 1 |
| 1 | 0 | 1 | 1 | 0 |
| 1 | 1 | 0 | 1 | 0 |
| 1 | 1 | 1 | 1 | 1 |
위 표는 전 가산기의 진리표다. 자리올림 입력인 Cin을 진리표에 추가했다. 출력은 Cin을 포함한 덧셈이다.
전가산기를 모델링한다. 작업 순서는 반가산기 모델링 작업과 같다. 먼저 전가산기의 껍데기를 만든다. 그리고 유닛 테스트를 만들어서 위 진리표를 테스트한다. 전가산기 모델은 내용이 없으므로 유닛 테스트는 실패할 것이다. 유닛 테스트 실패를 확인하고 다시 전가산기 모델로 돌아가서 전가산기 모델을 완성한다. 그리고 유닛 테스트를 다시 실행한다. 유닛 테스트를 통과 할 때까지 이 과정을 반복한다.
{caption="adder.rs | 전가산기 모델 추가"}
// ... 생략 ...

pub struct FullAdder {
    pub conn_a: bool,
    pub conn_b: bool,
    pub conn_cin: bool,
    pub conn_out_s: bool,
    pub conn_out_c: bool,

    halfadder1: HalfAdder,
    halfadder2: HalfAdder,
    orgate: gates::OrGate,
}

// ... 생략 ...

impl FullAdder {
    pub fn new() -> FullAdder {
        FullAdder {
            conn_a: false,
            conn_b: false,
            conn_cin: false,
            conn_out_s: false,
            conn_out_c: false,

            halfadder1: HalfAdder::new(),
            halfadder2: HalfAdder::new(),
            orgate: gates::OrGate::new(),
        }
    }
}

// ... 생략 ...

impl AdderInterfaces for FullAdder {
    fn proc(&mut self, input_a: bool, input_b: bool) {

    }
}
전가산기 모델은 반가산기 모델과 같은 파일인 adder.rs에 추가했다. 위 코드가 전가산기 모델 코드다. 중간에 생략한 것은 앞 장에서 작업한 반가산기 코드다. 3번째 줄에서 13번째 줄이 전가산기 모델의 구조체다. 전가산기는 입력 신호 3개, 출력 신호 2개가 있다. 그리고 게이트가 여러개 있긴 하지만 앞서 설명했듯 반가산기 두 개와 올림수(carry)를 묶어서 처리하는 OR 게이트 한 개가 전체 구성이다. FullAdder 구조체는 이 구성을 그대로 모델링했다. 17번째 줄에서 31번째 줄은 FullAdder 객체의 생성자다. 35번째 줄에서 39번째줄이 전가산기 모델의 본체다. 지금은 우선 유닛 테스트를 만들고 실패를 확인하는 것이 우선이기 때문에 여기까지 작업하고 유닛 테스트를 만든다.
전가산기 유닛 테스트도 adder_test.rs 파일에 작성한다.
{caption="adder_test.rs | 전가산기 유닛 테스트"}
// ... 생략 ...

#[test]
fn test_fulladder() {
    let mut full_adder = adder::FullAdder::new();

    full_adder.conn_cin = false;
    full_adder.proc(false, false);
    assert_eq!(false, full_adder.conn_out_c);
    assert_eq!(false, full_adder.conn_out_s);

    full_adder.conn_cin = false;
    full_adder.proc(false, true);
    assert_eq!(false, full_adder.conn_out_c);
    assert_eq!(true, full_adder.conn_out_s);

    full_adder.conn_cin = false;
    full_adder.proc(true, false);
    assert_eq!(false, full_adder.conn_out_c);
    assert_eq!(true, full_adder.conn_out_s);

    full_adder.conn_cin = false;
    full_adder.proc(true, true);
    assert_eq!(true, full_adder.conn_out_c);
    assert_eq!(false, full_adder.conn_out_s);

    full_adder.conn_cin = true;
    full_adder.proc(false, false);
    assert_eq!(false, full_adder.conn_out_c);
    assert_eq!(true, full_adder.conn_out_s);

    full_adder.conn_cin = true;
    full_adder.proc(false, true);
    assert_eq!(true, full_adder.conn_out_c);
    assert_eq!(false, full_adder.conn_out_s);

    full_adder.conn_cin = true;
    full_adder.proc(true, false);
    assert_eq!(true, full_adder.conn_out_c);
    assert_eq!(false, full_adder.conn_out_s);

    full_adder.conn_cin = true;
    full_adder.proc(true, true);
    assert_eq!(true, full_adder.conn_out_c);
    assert_eq!(true, full_adder.conn_out_s);
}
전가산기 유닛 테스트도 다른 유닛 테스트와 마찬가지로 전가산기의 진리표를 검증하는 코드다. 입력 Cin이 새로 생겨서 검증할 값이 두 배로 늘었다. 위 코드처럼 유닛 테스트를 만들고 실행해 본다.
running 2 tests
test test_fulladder ... FAILED
test test_halfadder ... ok
현상태에서는 예상한 대로 테스트에 실패한다. 이제 유닛 테스트를 통과할 때까지 반복하면서 전가산기 몸체 작업을 하면 된다.
{caption="adder.rs | 전가산기 모델 본체"}
mpl AdderInterfaces for FullAdder {
    fn proc(&mut self, input_a: bool, input_b: bool) {
        self.conn_a = input_a;
        self.conn_b = input_b;

        self.halfadder1.proc(input_a, input_b);
        self.halfadder2.proc(self.conn_cin, self.halfadder1.conn_out_s);

        self.conn_out_s = self.halfadder2.conn_out_s;
        self.conn_out_c = self.orgate.proc(self.halfadder1.conn_out_c, self.halfadder2.conn_out_c);
    }
}
전가산기의 입력 3개 중 입력 A, B 두 개는 첫 번째 반가산기의 입력으로 연결된다. 따라서 6번째 줄처럼 halfadder1.proc() 함수의 파라메터로 input_a와 input_b를 넣었다. 두 번째 반가산기의 입력을 Cin과 첫 번째 반가산기의 출력 S다. 7번째 줄 코드에 halfadder2.proc()를 호출한 코드가 그것을 모델링한 것이다. 그리고 두 번째 반가산기의 출력 S가 전가산기의 출력 S가 된다. 9번째 줄에 halfadder2의 conn_out_s 변수 값을 FullAdder 객체의 conn_out_s 변수에 입력한 코드가 그것을 모델링한 코드다. 마지막으로 두 반가산기의 출력 C는 OR게이트로 연결해서 그 결과가 전가산기의 출력 C가 된다. 10번째 줄이 해당 연결을 모델링한 것이다. 이렇게 전가산기 게이트 구성을 그대로 모델링했다.
작업 내용을 저장하고 테스트를 실행한다.
... 생략 ...
running 2 tests
test test_fulladder ... ok
test test_halfadder ... ok
... 생략 ...
테스트 결과를 보면 test_fulladder 테스트를 통과했다고 나온다. 전가산기 모델도 성공적으로 잘 만들었다. 이번 장에서 만든 전가산기는 1비트 전가산기다. 1비트 전가산기를 회로도에 그릴 때는 그냥 네모 박스에 이름을 써서 표현한다.
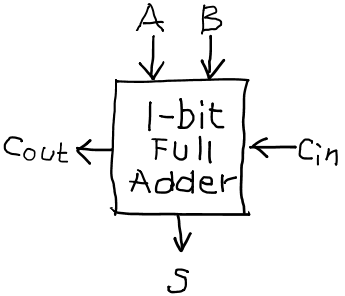
위 그림과 같다. 이름 붙인 네모 박스안에 게이트가 들어있다고 생각하는 것이다.
| 첨부 | 파일 크기 |
|---|---|
| 33.53 KB | |
| 14.7 KB |
댓글
코딩 인터뷰 등에서 + 연산자를 쓰지 않고 덧셈을
코딩 인터뷰 등에서 + 연산자를 쓰지 않고 덧셈을 구현하시오 같은 문제를 만나면 이 글에 있는 adder를 그대로 코드로 구현하시면 됩니다.
이렇게요.
더 예쁘게 코드 만들 수도 있을 것 같은데, 뭐 대충 이런식입니다.
----------------------
얇은 사 하이얀 고깔은 고이 접어서 나빌레라
Unit test에서는 써도 되죠?
댓글 달기