Ubuntu 18.04 Tensorflow 설치, windows환경에서 리눅스 설치부터 Tensorflow 실행까지

사진이 왜인지 잘 안올라가서 사진은 조금만 넣고 글과 링크로 작성하겠습니다.
초보자도 그대로 쭉 따라하기만 하면 문제없이 설치될 수 있도록 정리했습니다..
가장 최근 버전인 Linux GPU Tensorflow 1.9 설치입니다.
시작 PC 환경
laptop, Windows 10 64bit, intel core i7-7700, gtx1050
듀얼부팅 작업부터 시작합니다
듀얼부팅 작업에 문제 없으신 분들은 넘어가셔도 됩니다.
[ Ubuntu 18.04 설치 ]
https://www.ubuntu.com/download/desktop
다운로드 링크에서 다운받아주세요
링크에서 다운르도 버튼을 누르면 자동으로 시작됩니다.
[ 파티션 할당과 부팅 USB 만들기 ]
http://jimnong.tistory.com/676
이곳을 참고하셔서 만드시면 됩니다.
[ 설치 시작하기 ]
설치가 정상적으로 시작되지 않는다면 (화면이 멈춘다거나)
부팅 시 GNU GRUB 화면(선택화면) 이 나왔을때,
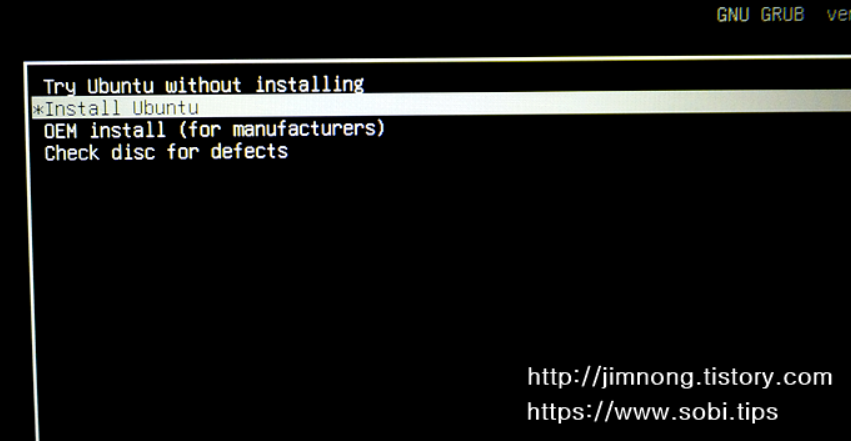
e를 눌러주시고 quiet splash를 찾으셔서 뒤에 nomodeset을 붙혀주세요.
(Ubuntu 설치시 Nvidia 그래픽카드 충돌문제 해결법 : http://reachlab-kr.github.io/linux/2015/09/13/Ubuntu-Nvidia-nomodeset.html)
설치는 English로 해주세요
[ 파티션 나누기 ]
아까 위의 링크, http://jimnong.tistory.com/676를 참고하셔서
설치를 계속 진행하시다보면 파티션을 나눠야하는 구간이 나오는데
추천하는 설정은
1. Swap영역 ___ size : memmory size와 같게 또는 2배
2. bios boot 영역 ___ size : 100~150mb if too big, booting slow
3. efi 영역 ___ size : 150mb
4. ubuntu os를 위한 EXT4 ___ 마운트위치 : "/" ___ size : 15GB~30GB~40GB
5. home dir를 위한 EXT4 ___ 마운트위치 : "/home" ___ size : 여유만큼
그리고 bootloader 같은 경우에는 ubuntu os가 설치되어있는 파티션으로 설정하시면 됩니다.
[ ubuntu 실행 ]
이때 우분투 설치가 끝난 후, 부팅 GRUB화면이 다시 나오는데
그래픽 카드 충돌 문제 있으시다면 바로 실행하지 마시고 e를 누르셔서 한번더 nomodeset을 설정해주셔야 합니다.
[ ndivia driver 설치 ]
ndivia driver는
$ ubuntu-drivers devices
$ sudo apt instal nvidia-driver-yourversion
해당 방법으로 설치해야 문제가 없습니다.
Software & update 같은 곳에서 설치를 진행하면 왜인지 충돌이 일어납니다.
자신의 그래픽카드에 맞는 알맞은 버전으로 설치해주세요.
https://belepi93.github.io/ubuntu-1804-settings/
만일에, ndivia driver 설치하기 전에 컴퓨터 다시시작하시면 한번더 nomodeset 입력하시고 들어와주세요.
[ git과 vim 설치 ]
그리고 추가로 tensorflow 소스를 받기위한 git과 편집기인 vim을 설치해줍니다.
$ sudo apt install git
$ sudo apt install vim
---------------------------------------------------------------
여기서부터 tensorflow build를 위한 필수 환경 구성입니다.
[ bazel 설치 ]
https://github.com/bazelbuild/bazel/releases
링크에 가셔서
bazel-0.14.1-installer-linux-x86_64.sh 175mb
찾아 설치해주세요
다운로드하시는 동안
$ sudo apt-get install pkg-config zip g++ zlib1g-dev unzip python
$ python --version
만일 python 2.7 일 경우
$ sudo apt-get install python-numpy python-dev python-pip python-wheel
만일 python 3.n 일 경우
$ sudo apt-get install python3-numpy python3-dev python3-pip python3-wheel
진행해주시고,
다운로드가 끝나시면 다운로드된 폴더에 가셔서
$ chmod +x bazel-0.14.1-installer-linux-x86_64.sh
$ ./bazel-0.14.1-installer-linux-x86_64.sh --user
진행해주시면 bazel 설치가 완료됩니다.
[ cuda installation ]
GPU를 위한 CUDA 설치입니다.
gcc-6버전과 g++-6버전을 준비합니다.
$ sudo apt install gcc-6
$ sudo apt install g++-6
https://developer.nvidia.com/cuda-90-download-archive?target_os=Linux&target_arch=x86_64&target_distro=Ubuntu&target_version=1704&target_type=runfilelocal
해당 링크에 가셔서
linux -> x86_64 -> Ubuntu -> 17.04 -> runfile 항목을 다운받아주세요
deb 파일은 간혹 오류가 일어난다고 합니다.
$ lspci | grep -i nvidia
를 통해 다시한번 드라이버를 체크해주시고 만일 없으시다면
위의 [ ndivia driver 설치 ] 를 다시 진행해주세요
$ sudo apt-get install linux-headers-$(uname -r)
를 통해 사전 환경을 체크합니다.
그리고
$ sudo sh cuda_9.0.176_384.81_linux.run --override
를 통해 cuda를 설치합니다.
명령어를 실행하면 조금 동작하다 말고 0%에서 계속 멈춰있는데,
그 부분은 사실 다운로드가 아니라 사용자 계약서 부분입니다.
기다리시지 마시고 엔터 꾹 누르셔서 읽으면서 넘기시거나,
ctrl+c 누르신 후에
accept 해주세요
후에 나오는 질문엔,
install on unsupported configuration? Y
install nvidia driver? n
location : 엔터눌러서 디폴트로 해주세요
그러면 CUDA 설치 완료입니다.
CUDA 설치 공식문서 : https://docs.nvidia.com/cuda/cuda-installation-guide-linux/
[ cuDNN 설치 ]
https://developer.nvidia.com/cudnn
링크 가셔서 로그인 후에 약관 동의해주세요
최신버전 다운 받지 마시고 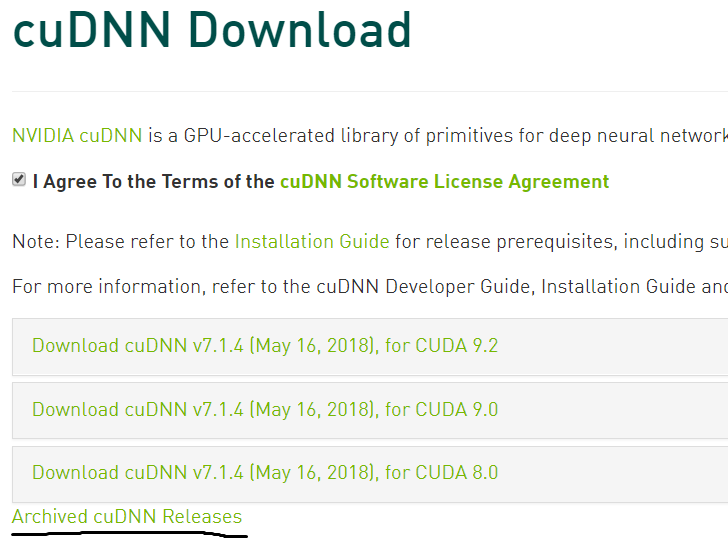
Archived cuDNN Releases 누르신 후에
Download cuDNN v7.0.5 (Dec 5, 2017), for CUDA 9.0 의
cuDNN v7.0.5 Library for Linux
받아주세요
$ tar -xzvf cudnn-9.0-linux-x64-v7.tgz
$ sudo cp cuda/include/cudnn.h /usr/local/cuda/include
$ sudo cp cuda/lib64/libcudnn* /usr/local/cuda/lib64
$ sudo chmod a+r /usr/local/cuda/include/cudnn.h
$ sudo chmod a+r /usr/local/cuda/lib64/libcudnn*
후에 다운로드 폴더에서 해당 명령어 그대로 수행해주세요
cuDNN설치 공식문서 : https://docs.nvidia.com/deeplearning/sdk/cudnn-install/
[ PATH 설정 ]
이제 설치한 것들의 PATH를 설정해주세요 (cuda 9.0 / python2,7 기준)
.bashrc 파일에
export CUDA_HOME=/usr/local/cuda
export LD_LIBRARY_PATH=${CUDA_HOME}/lib64
PATH=${CUDA_HOME}/bin:${PATH}
export PATH
PYTHONPATH="${PYTHONPATH}:/usr/local/lib/python2.7/dist-packages/"
export PYTHONPATH
넣어주시고 저장,
후에
$ source .bashrc
해주세요
---------------------------------------------------
이제 여기서부터는 텐서플로우 빌드부분입니다.
[ tensorflow ]
$ git clone https://github.com/tensorflow/tensorflow
해주시면 home 다이렉토리에 tensorflow 폴더가 생깁니다.
그 tensorflow 폴더 안에 configure 파일이 있는데, 그 파일을 실행시켜줍니다.
$ cd tensorflow # cd to the top-level directory created
$ ./configure
실행시키면 설정에 대해 질문이 나오는데요,
만일 위의 과정을 그대로 따라하셨다면
Do you wish to build TensorFlow with CUDA support? Y
이 질문을 제외하고는 그냥 엔터 눌러서 디폴트로 하시면 됩니다.
이제 tensorflow source build를 위해 구성 작업을 해야하는데,
tensorflow는 gcc 5 이상의 버전으로는 빌드가 진행이 안됩니다.
4.8 버전을 받아서 gcc 버전에 4.8 버전을 등록시키는 작업을 진행해주세요.
$sudo apt install gcc-4.8
$sudo apt install g++-4.8
$sudo update-alternatives --install /usr/bin/gcc gcc /usr/bin/gcc-4.8 40 --slave /usr/bin/g++ g++ /usr/bin/g++-4.8
$sudo update-alternatives --config gcc
$sudo apt-get install gcc-4.4
그리고 cuda에도 적용시켜줍니다.
$ sudo ln -s /usr/bin/gcc-4.8 /usr/local/cuda/bin/gcc
$ sudo ln -s /usr/bin/g++-4.8 /usr/local/cuda/bin/g++
만일에 이미 있는 파일이라는 식의 오류가 나오면
/usr/local/cuda/bin/gcc, /usr/local/cuda/bin/g++
두 파일 모두 지워주시고 다시 명령어 실행시켜주세요
$pip install mock
해당 명령어로 mock를 설치해줘야 중간에 오류가 없습니다.
(How To Image Retraining : ImportError: No module named mock: https://github.com/tensorflow/tensorflow/issues/3408)
$ bazel build --config=opt --config=cuda //tensorflow/tools/pip_package:build_pip_package
를 실행해줍니다
빌드 작업이 시작됩니다. 11000개 정도의 파일이 빌드되며 저는 약 1시간 20분 걸렸습니다.
참고로 확인은 못했지만 ram에 관련된 issue가 생기면
$ bazel build --config=opt --config=cuda //tensorflow/tools/pip_package:build_pip_package --cxxopt="-D_GLIBCXX_USE_CXX11_ABI=0" --local_resources 2048,.5,1.0
로 진행하면 된다고 합니다..
tensorflow 공식 설치 가이드 홈페이지 : https://www.tensorflow.org/install/install_sources
후에 자신이 다운받은 tensorflow 버전에 맞게 명령어를 실행시켜주세요.
$ sudo -H pip install /tmp/tensorflow_pkg/tensorflow-[YOUR VERSION]-py2-none-any.whl
사실 자신의 버전이 뭔지 알필요 없이
$ sudo -H pip install /tmp/tensorflow_pkg/tensorflow-
에서 tab누르고 실행해주셔도 되요.
10~30kb/s라는 엄청난 속도로... 필요한 파일들이 다운됩니다.
만일 명령어 실행중 에러가 있었다면, 또는 에러가 없는것 같아도 확실히 하고싶으시면
버전에 맞게
$sudo -H pip install --upgrade /tmp/tensorflow_pkg/tensorflow-[YOUR VERSION]-py2-none-any.whl
해주시면 됩니다.
$ sudo -H pip install --upgrade /tmp/tensorflow_pkg/tensorflow-
마찬가지로 여기서 tab누르셔도 됩니다.
[ tensorflow 실행하기 ]
이제 완전히 끝났습니다.
이제 tensorflow를 실행할 수 있습니다.
그런데 주의해야 할 점으로
*** tensorflow 폴더 밖에서만 tensorflow가 실행되니 ***
테스트하실때 폴더 밖으로 나가서 해주세요.
(No module named tensorflow.python.platform : https://github.com/tensorflow/tensorflow/issues/16264)
$ python
>> import tensorflow as tf
>> hello = tf.constant('Hello, TensorFlow!')
>> sess = tf.Session()
>> print(sess.run(hello))
해주시면 Hello, TensorFlow! 가 출력됩니다!
i need some help,,, plz,,
thank you so much for your kind. but i have some problems
when i put in the code;bazel build --config=opt --config=cuda //tensorflow/tools/pip_package:build_pip_package
i received error messages
WARNING: The following configs were expanded more than once: [cuda, using_cuda]. For repeatable flags, repeats are counted twice and may lead to unexpected behavior.
INFO: Options provided by the client:
Inherited 'common' options: --isatty=1 --terminal_columns=80
INFO: Reading rc options for 'build' from /home/in/tensorflow/.bazelrc:
'build' options: --apple_platform_type=macos --define framework_shared_object=true --define open_source_build=true --define=use_fast_cpp_protos=true --define=allow_oversize_protos=true --spawn_strategy=standalone --strategy=Genrule=standalone -c opt --cxxopt=-std=c++14 --host_cxxopt=-std=c++14 --announce_rc --define=grpc_no_ares=true --define=PREFIX=/usr --define=LIBDIR=$(PREFIX)/lib --define=INCLUDEDIR=$(PREFIX)/include --config=v1
INFO: Reading rc options for 'build' from /home/in/tensorflow/.tf_configure.bazelrc:
'build' options: --host_force_python=PY2 --action_env PYTHON_BIN_PATH=/usr/bin/python --action_env PYTHON_LIB_PATH=/usr/lib/python2.7/dist-packages --python_path=/usr/bin/python --config=xla --action_env CUDA_TOOLKIT_PATH=/usr/local/cuda --action_env TF_CUDA_COMPUTE_CAPABILITIES=3.5,7.0 --action_env LD_LIBRARY_PATH=/usr/local/cuda/lib64 --action_env GCC_HOST_COMPILER_PATH=/usr/bin/gcc-4.8 --config=cuda --action_env TF_CONFIGURE_IOS=0
INFO: Found applicable config definition build:v1 in file /home/in/tensorflow/.bazelrc: --define=tf_api_version=1
INFO: Found applicable config definition build:xla in file /home/in/tensorflow/.tf_configure.bazelrc: --define with_xla_support=true
INFO: Found applicable config definition build:cuda in file /home/in/tensorflow/.bazelrc: --config=using_cuda --define=using_cuda_nvcc=true
INFO: Found applicable config definition build:using_cuda in file /home/in/tensorflow/.bazelrc: --define=using_cuda=true --action_env TF_NEED_CUDA=1 --crosstool_top=@local_config_cuda//crosstool:toolchain
INFO: Found applicable config definition build:opt in file /home/in/tensorflow/.tf_configure.bazelrc: --copt=-march=native --copt=-Wno-sign-compare --host_copt=-march=native --define with_default_optimizations=true
INFO: Found applicable config definition build:cuda in file /home/in/tensorflow/.bazelrc: --config=using_cuda --define=using_cuda_nvcc=true
INFO: Found applicable config definition build:using_cuda in file /home/in/tensorflow/.bazelrc: --define=using_cuda=true --action_env TF_NEED_CUDA=1 --crosstool_top=@local_config_cuda//crosstool:toolchain
Traceback (most recent call last):
File "/home/in/.cache/bazel/_bazel_in/9b3776a89d21da83624eff9d380b5d85/external/org_tensorflow/tensorflow/tools/git/gen_git_source.py", line 29, in
from builtins import bytes # pylint: disable=redefined-builtin
ImportError: No module named builtins
ERROR: /home/in/tensorflow/tensorflow/core/BUILD:2753:1: no such package '@local_config_git//': Traceback (most recent call last):
File "/home/in/tensorflow/third_party/git/git_configure.bzl", line 61
_fail(result.stderr)
File "/home/in/tensorflow/third_party/git/git_configure.bzl", line 14, in _fail
fail(("%sGit Configuration Error:%s %...)))
Git Configuration Error: Traceback (most recent call last):
File "/home/in/.cache/bazel/_bazel_in/9b3776a89d21da83624eff9d380b5d85/external/org_tensorflow/tensorflow/tools/git/gen_git_source.py", line 29, in
from builtins import bytes # pylint: disable=redefined-builtin
ImportError: No module named builtins
and referenced by '//tensorflow/core:version_info_gen'
ERROR: Analysis of target '//tensorflow/tools/pip_package:build_pip_package' failed; build aborted: no such package '@local_config_git//': Traceback (most recent call last):
File "/home/in/tensorflow/third_party/git/git_configure.bzl", line 61
_fail(result.stderr)
File "/home/in/tensorflow/third_party/git/git_configure.bzl", line 14, in _fail
fail(("%sGit Configuration Error:%s %...)))
Git Configuration Error: Traceback (most recent call last):
File "/home/in/.cache/bazel/_bazel_in/9b3776a89d21da83624eff9d380b5d85/external/org_tensorflow/tensorflow/tools/git/gen_git_source.py", line 29, in
from builtins import bytes # pylint: disable=redefined-builtin
ImportError: No module named builtins
INFO: Elapsed time: 1.863s
INFO: 0 processes.
FAILED: Build did NOT complete successfully (41 packages loaded, 1525 targets \
configured)
댓글 달기