.spec 질문드립니다.
<.spec> 파일 내용
Release: 1%{?dist}
Summary: A test package
Group: thearmor Package
License: GPL
URL: http://test.example.com
Source0: %{name}-%{version}.tar.gz
BuildRoot: %{_tmppath}/%{name}-%{version}-%{release}-root
BuildRequires: /bin/rm, /bin/mkdir, /bin/cp
Requires: /bin/bash, /bin/date
%description
Demo package for deployment of one single file
%prep
%setup -q
%pre
find /home/nfs/$USER -name 'thearmor*' | xargs rm -rf
%post
find /home/$USER/Desktop -name 'thearmor*.tar.gz' -exec tar -xvf {} -C /home/nfs/$USER \;
chown -R xuser.xuser /home/nfs/$USER/thearmor
%build
#configure
#make %{? _smp_mflags}
%install
rm -rf $RPM_BUILD_ROOT
#make install DESTDIR=$RPM_BUILD_ROOT
mkdir -p $RPM_BUILD_ROOT/usr/local/bin
cp -r thearmor $RPM_BUILD_ROOT/usr/local/bin
%clean
rm -rf $RPM_BUILD_ROOT
%files
%defattr(-,root,root,-)
#%doc
%attr(755,root,root)/usr/local/bin/thearmor
이렇게 작성하였고
rpmbuild/SPECS에서
rpmbuild --sign -ba thearmor.spec하면
첨부한 캡쳐화면과 같이 /usr/lib/strip 오류가 나오는데
구글에 검색해도 해결하지 못하는 중인데 해결방법이 있을까요?
| 첨부 | 파일 크기 |
|---|---|
| 113.43 KB |
에러가 발생했을 때, $RPM_BUILD_ROOT
에러가 발생했을 때, $RPM_BUILD_ROOT/usr/local/bin 에 어떤 파일이 있던가요?
spec 상으로는 thearmor 파일이 있어야 할 것 같은데, 빌드 에러 발생시에는 "thearmor/블라블라" 파일이 있는 것으로 나오네요.
아마도 %install 에서
부분이 님이 의도한 대로 되지 않은 것 같습니다.
그리고 왠만하면 결과물은 텍스트로 copy&paste 하세요. 이미지로 첨부하면 답하는 사람이 일일이 typing 을 해야 할 수도 있습니다. 답변할때 답변할지 말지 상당히 고민 됩니다.
제가 해야 될 항목이
제가 해야 될 항목이
1. /home/nfs/$USER에 있는 thearmor이름은 가진 파일들을 찾아서 삭제 => pre에서 정의
2. /home/$USER/Desktop에 thearmor이름은 가진 tar.gz을 찾아서 압축 해제 후 그거를 /home/nfs/$USER로 풀고
/home/nfs/$USER 파일 권한을 sychung으로 변경 => post에서 정의
그래서 제가 수정한 spec 파일 내용은
%define debug_package %{nil}
Name: thearmor
Version: 1.0.0
Release: 1%{?dist}
Summary: A test package
Group: thearmor Package
License: GPL
URL: http://test.example.com
Source0: %{name}-%{version}.tar.gz
BuildRoot: %{_tmppath}/%{name}-%{version}-%{release}-root
BuildRequires: /bin/rm, /bin/mkdir, /bin/cp
Requires: /bin/bash, /bin/date
%description
Demo package for deployment of one single file
%prep
%setup -q
%pre
find /home/nfs/$USER -name 'thearmor*' | xargs rm -rf
%post
find /home/$USER/Desktop -name 'thearmor*.tar.gz' -exec tar -xvf {} -C /home/nfs/$USER \;
chown -R xuser.xuser /home/nfs/$USER/thearmor
%build
#configure
#make %{? _smp_mflags}
%install
cp -r thearmor $RPM_BULID_ROOT/home/nfs/sychung
%clean
rm -rf $RPM_BUILD_ROOT
%files
%defattr(-,root,root,-)
#%doc
%attr(755,root,root)/usr/local/bin/thearmor
%changelog
* Fri Jun 19 2020 sychung - 1.0.0
- Creation of initial RPM
이렇게 됩니다
rpmbuild 빌드 순서는
1. cd ~
2. rpmbuild thearmor.spec
3. cp thearmor-1.0.0.tar.gz rpmbuild/SOURCES/
4. cp thearmor.spec rpmbuild/SPECS/
5. cd rpmbuild/SPECS
6. rpmbuild --sign -ba thearmor.spec
입니다.
그런데 아래와 같은 오류가 나서 조언을 구합니다
<오류 문구>
+ umask 022
+ cd /home/sychung/rpmbuild/BUILD
+ cd /home/sychung/rpmbuild/BUILD
+ rm -rf thearmor-1.0.0
+ /usr/bin/tar -xf -
+ /usr/bin/gzip -dc /home/sychung/rpmbuild/SOURCES/thearmor-1.0.0.tar.gz
+ STATUS=0
+ '[' 0 -ne 0 ']'
+ cd thearmor-1.0.0
+ /usr/bin/chmod -Rf a+rX,u+w,g-w,o-w .
+ exit 0
+ umask 022
+ cd /home/sychung/rpmbuild/BUILD
+ cd thearmor-1.0.0
+ exit 0
+ umask 022
+ cd /home/sychung/rpmbuild/BUILD
+ '[' /home/sychung/rpmbuild/BUILDROOT/thearmor-1.0.0-1.el7.x86_64 '!=' / ']'
+ rm -rf /home/sychung/rpmbuild/BUILDROOT/thearmor-1.0.0-1.el7.x86_64
++ dirname /home/sychung/rpmbuild/BUILDROOT/thearmor-1.0.0-1.el7.x86_64
+ mkdir -p /home/sychung/rpmbuild/BUILDROOT
+ mkdir /home/sychung/rpmbuild/BUILDROOT/thearmor-1.0.0-1.el7.x86_64
+ cd thearmor-1.0.0
+ cp -r thearmor /home/nfs/sychung
+ /usr/lib/rpm/check-buildroot
+ /usr/lib/rpm/redhat/brp-compress
+ /usr/lib/rpm/redhat/brp-strip /usr/bin/strip
+ /usr/lib/rpm/redhat/brp-strip-comment-note /usr/bin/strip /usr/bin/objdump
+ /usr/lib/rpm/redhat/brp-strip-static-archive /usr/bin/strip
+ /usr/lib/rpm/brp-python-bytecompile /usr/bin/python 1
+ /usr/lib/rpm/redhat/brp-python-hardlink
+ /usr/lib/rpm/redhat/brp-java-repack-jars
 error: File not found: /home/sychung/rpmbuild/BUILDROOT/thearmor-1.0.0-1.el7.x86_64/usr/local/bin/thearmor
File not found: /home/sychung/rpmbuild/BUILDROOT/thearmor-1.0.0-1.el7.x86_64/usr/local/bin/thearmor
도대체 어디부분을 고쳐야 제가 원하는 spec 파일을 만들 수 있을까요?
갈 길이 좀 멀어보이지만, 디버그 패키지 제작을
갈 길이 좀 멀어보이지만, 디버그 패키지 제작을 막아버리신 것은 훌륭하시고요.
일단 올려주신 것 중에선
~/.rpmmacros 로 빌드 디렉토리는 옳게 다 바꾸신 것 같습니다.
그리고,
> 제가 해야 될 항목이
> 1. /home/nfs/$USER에 있는 thearmor이름은 가진 파일들을 찾아서 삭제 => pre에서 정의
>
> 2. /home/$USER/Desktop에 thearmor이름은 가진 tar.gz을 찾아서 압축 해제 후 그거를 /home/nfs/$USER로 풀고
> /home/nfs/$USER 파일 권한을 sychung으로 변경 => post에서 정의
>
이렇게하면 패키지로 만드는 의미가 없는데요.
srpm 을 가지고 rpm 을 제작하지 못하는데, 무엇때문에 시간 낭비를 하고 계신지 물어봐도 될까요 ?
제가 하는 목적이 윈도우에서 .exe파일을 실행하면
> 1. /home/nfs/$USER에 있는 thearmor이름은 가진 파일들을 찾아서 삭제 => pre에서 정의
>
> 2. /home/$USER/Desktop에 thearmor이름은 가진 tar.gz을 찾아서 압축 해제 후 그거를 /home/nfs/$USER로 풀고
> /home/nfs/$USER 파일 권한을 sychung으로 변경 => post에서 정의
>
이부분은 원래 상대방이 해야되는 작업인데 제가 .spec에 자동으로 할수있게 구현한겁니다.
질문사항이 있습니다.
<헤더>
1. BuilrdRoot가 ~/rpmbuild여야 하는지 ~/rpmbuild/BuildRoot 여야 하는지 궁금합니다.
2. BuildRequires 와 Requires는 없어도 되는 걸로 알고있는데 맞는지요
<메크로>
1. %install, %file, %attr
제가 rpm패키지를 만드는 목적이 상대방에게 .tar.gz 압축파일을 보내주면
1. 압축 해제(/home/sychung/Desktop에서 해제)
2. 권한 변경
3. 원하는 경로(/home/nfs/sychung) 옮기고 해야합니다.
위의 작업이 복잡하다고 하여, 패지키를 만들고 rpm으로 설치만 하면 자동으로
수행하는 작업을 시도중입니다.
1~3번 작업을 해야 하는 과정에서 질문사항에 있는 부분(.spec 내용)을 어떻게 수정을 하면
좋을까요?
pre/post 의 역할에 대한 이해가 잘못된 것
pre/post 의 역할에 대한 이해가 잘못된 것 같고요. 의도대로 되는 rpm 은 제작이 불가능 할 것 같습니다.
일단, 빌드 에러 부터 보자면
이 에러는 rpm 제작시에, /usr/local/bin 에 install 을 한 내역이 없으니 당연히 file not found 가 발생할 수 밖에 없습니다.
즉 spec file 을 보면
/home/nfs/sychung 에 install 을 시켜놓고, 파일은 /usr/local/bin 에서 찾고 있는 격이 되는 거죠. 당연히 /usr/local/bin 으로 install 시켜놓은 내역이 없으니 찾을 리가 만무 하고요.
그리고, 사용자별 지우는 것을 원한다고 하셨는데,
위의 명령에서 $USER 변수는 rpm 을 설치하는 계정의 $USER 변수 값이 들어가게 됩니다. 즉, rpm 설치를 할 때 1번만 rpm 을 설치하는 사용자의 디렉토리에만 반영이 된다는 얘기 입니다. 즉 다른 계정에 대해서는 처리를 해 주지 않습니다. 그러므로 rpm 을 설치 하기 위해서는 rpmdb 갱신이 필요하므로 root 권한으로 설치를 해야 하고, 그렇게 되면 $USER 는 root 밖에 될 수 없다는 얘기 입니다.
제가 이번에 처음으로 rpm를 접해서 이해를 못하는
우선 답변 감사합니다.
제가 이번에 처음으로 rpm를 접해서 이해를 못하는 부분이 많이있네요..
제가 알고있는
%pre 매크로는 설치전에 실행하는것 으로 알고있고
%post 매크로는 설치 직후에 실행해야 한다
로 알고있는데 이게 아닌가요?
또한
위의 명령에서 $USER 변수는 rpm 을 설치하는 계정의 $USER 변수 값이 들어가게 됩니다. 즉, rpm 설치를 할 때 1번만 rpm 을 설치하는 사용자의 디렉토리에만 반영이 된다는 얘기 입니다. 즉 다른 계정에 대해서는 처리를 해 주지 않습니다
>> 이렇게 말씀해주신거는 다른 계정에 대해서는 처리를 안해줘도 됩니다. 한계정에서만 적용하면 됩니다.
그러면 제가 의도하는 rpm 제작을 할려면 어떻게 해야할까요...
몇일동안 구글링 검색을 하였지만 처음이다 보니깐 계속 헛된시간을 보내는거 같네요ㅠㅠ
추가로 제가 작성한 spec 사양입니다.
%define debug_package %{nil}
Name: thearmor
Version: 1.0.0
Release: 1%{?dist}
Summary: A test package
Group: thearmor Package
License: GPL
URL: http://test.example.com
Source0: %{name}-%{version}.tar.gz
BuildRoot: %{_tmppath}/%{name}-%{version}-%{release}-root
BuildRequires: /bin/rm, /bin/mkdir, /bin/cp
Requires: /bin/bash, /bin/date
%description
Demo package for deployment of one single file
%prep
%setup -q
%pre
find /home/nfs/sychung -name 'thearmor*' | xargs rm -rf
%post
find /home/sychung/Desktop -name 'thearmor*.tar.gz' -exec tar -xvf {} -C /home/nfs/sychung \;
#chown -R sychung.sychung /home/nfs/$USER/thearmor
%build
#configure
#make %{? _smp_mflags}
%install
cp -r thearmor $RPM_BUILD_ROOT/home/nfs/sychung
chown -R sychug.sychung /home/nfs/sychung/thearmor
%clean
rm -rf $RPM_BUILD_ROOT
%files
%defattr(-,root,root,-)
#%doc
%attr(755,root,root)/home/nfs/sychung/thearmor
<오류구문>
[sychung@localhost SPECS]$ cd ~
[sychung@localhost ~]$ rpmbuild thearmor.spec
[sychung@localhost ~]$ cp thearmor-1.0.0.tar.gz rpmbuild/SOURCES/
[sychung@localhost ~]$ cp thearmor.spec rpmbuild/SPECS/
[sychung@localhost ~]$ cd rpmbuild/SPECS/
[sychung@localhost SPECS]$ rpmbuild --sign -ba thearmor.spec
+ umask 022
+ cd /home/sychung/rpmbuild/BUILD
+ cd /home/sychung/rpmbuild/BUILD
+ rm -rf thearmor-1.0.0
+ /usr/bin/gzip -dc /home/sychung/rpmbuild/SOURCES/thearmor-1.0.0.tar.gz
+ /usr/bin/tar -xf -
+ STATUS=0
+ '[' 0 -ne 0 ']'
+ cd thearmor-1.0.0
/var/tmp/rpm-tmp.C6Oo12: line 35: cd: thearmor-1.0.0: No such file or directory
error: Bad exit status from /var/tmp/rpm-tmp.C6Oo12 (%prep)
Bad exit status from /var/tmp/rpm-tmp.C6Oo12 (%prep)
이렇게 나오는데 무엇이 문제인지를 모르겠네요 ㅠㅠ
참 다양하게 에러를 발생 시키시네요 :) 질문할 때
참 다양하게 에러를 발생 시키시네요 :) 질문할 때 마다 에러 위치가 달라지는 것 같습니다.
Source0 으로 지정된 파일의 압축을 풀었을 때, thearmor-1.0.0 이라는 디렉토리로 풀어져야 하는데 그렇지 않아서 발생하는 문제 입니다. 이제껏 압축 파일 잘 만들어 오시다가 이번에는 다르게 압축 파일을 만든 것이 문제 입니다.
이건 여전히 왜 하는지 모르겠네요. 이전에 설치된 파일을 제거하고 싶은 건가요? 이전에 설치된 /home/nfs/sychung/thearmor 파일을 지우고 싶은 것이라면, 이건 rpmdb 에서 알아서 하므로 전혀 필요 없습니다. 아니면 post 에서 풀어 놓는 파일 때문이라도 어차피 덮어 쓸 것이기 때문에 의미 없는 action 일 것 같습니다.
post script 도 마찬가지로, 그냥 rpm build 시에 포함 시켜서 가지고 있으면 될 것 같은데, 굳이 post script 에서 따로 압축 파일을 관리할 필요가 있는지도 애매하고,
20년전에 작성된 글이지만 (작성자는 제가 아니라 김병찬님입니다. 저는 스크랩을 해 두었을 뿐)
http://linux.sarang.net/~oops/rpm-doc/rpm.txt
http://linux.sarang.net/~oops/rpm-doc/package.txt
참조해서 rpm build 에 대해서 좀 더 공부를 하시는 것이 좋겠습니다. 현재 상태로 빌드를 하면서 질문을 하는 것은 질문자나 답변자나 서로 괴롭히는 일이 될 것 같습니다.
저도 왜 그러는지 답답하네요 ㅠㅠ
보내주신거 링크보고 공부해서
%define debug_package %{nil}
Name: thearmor
Version: 1.0.0
Release: 1%{?dist}
Summary: A test package
Group: thearmor Package
License: GPL
URL: http://test.example.com
Source0: %{name}-%{version}.tar.gz
#BuildRoot: %{_tmppath}/%{name}-%{version}-%{release}
#BuildRequires: /bin/rm, /bin/mkdir, /bin/cp
#Requires: /bin/bash
%description
Demo package for deployment of one single file
%prep
%setup -q
#%pre
#find /home/nfs/sychung -name 'thearmor*' | xargs rm -rf
#%post
#find /home/sychung/Desktop -name 'thearmor*.tar.gz' -exec tar -xvf {} -C /home/nfs/sychung \;
#chown -R sychung.sychung /home/nfs/$USER/thearmor
%build
#configure
#make %{? _smp_mflags}
%install
rm -rf $RPM_BUILD_ROOT
mkdir -p $RPM_BUILD_ROOT/home/nfs/sychung/thearmor
cp -r thearmor-1.0.0 $RPM_BUILD_ROOT/home/nfs/sychung/thearmor
%clean
rm -rf $RPM_BUILD_ROOT
%files
%defattr(-,sychung,sychung,-)
#%doc
%attr(755,sychung,sychung)/home/nfs/sychung
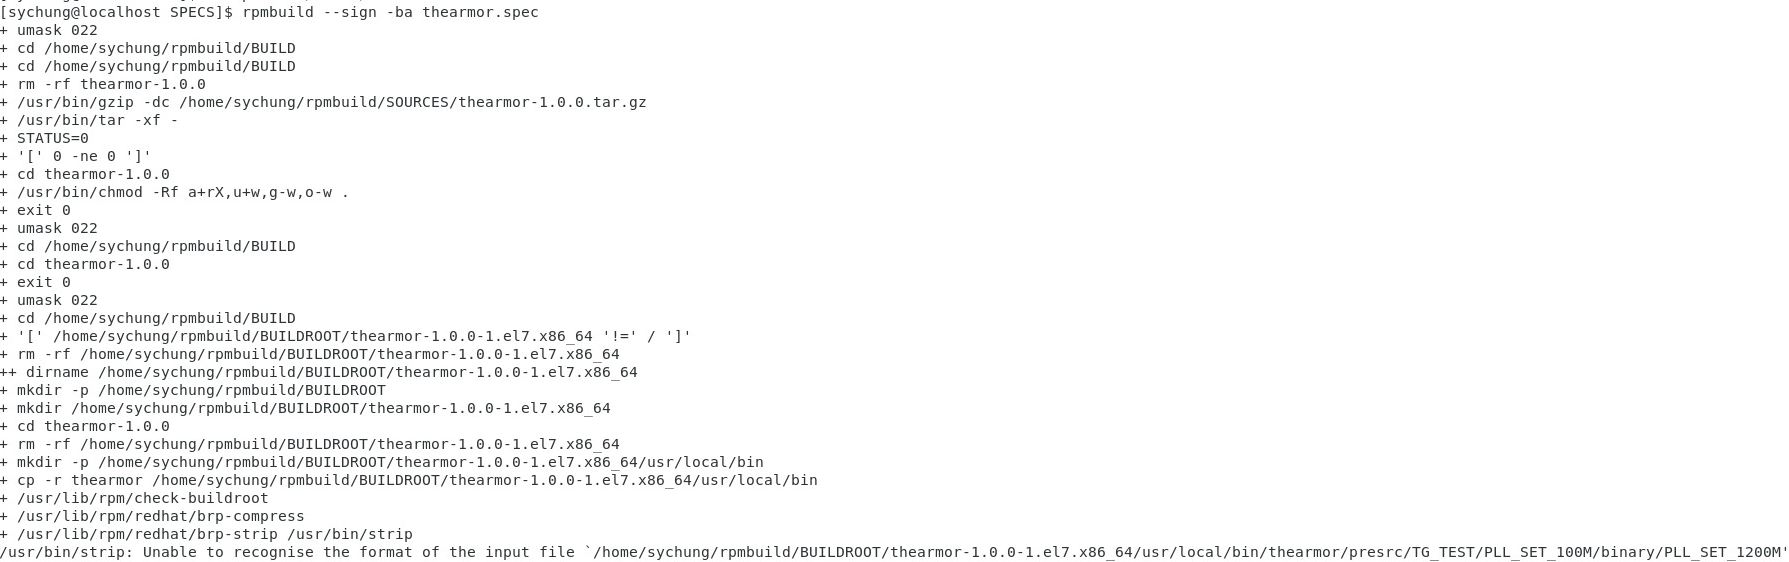
이렇게 spec 사양 만들었더니 /usr/bin/strip: unable to recognise the format of the input file
이라고 나오네요 뭔가 잘되고 있는거 같긴하네요
strip error 가 발생한 경로가 실제 있는지,
strip error 가 발생한 경로가 실제 있는지, 그리고 binary file 인지를 확인해 보세요.
strip 명령은 이진 파일에서 필요 없는 부분을 제거하여 사이즈를 줄이는 명령입니다.
그리고, %files 에서 sychung 이라는 account 가 없는 시스템에서 설치를 시도하거나, 또는 빌드한 시스템과 설치하는 시스템에서 sychung account 의 UID 가 다른 경우, 의도하지 않은 문제가 발생할 수 있습니다. 이 점의 차이는 인지 하시고 지정하여야 합니다.
참고로, 일단 #% 이렇게 주석 처리한 것들 다 지우고 해 보세요. rpm 버전에 따라 #% 와 같이 macro 를 주석 처리할 경우, 주석 처리가 되지 않는 경우가 있습니다. #%post 이렇게 하는 것 보다는 #post 로 주석처리를 하세요. 디버깅을 할 때는 주석 처리 보다는 아예 제거를 하는 것이 헷갈릴 소지가 더 줄어 들 것 같습니다.
댓글 달기