데비안 그누/리눅스 (Debian GNU/Linux) 6.0 사용하기

(11/12/2011;)
데비안 그누/리눅스 (Debian GNU/Linux)를 줄여 데비안으로 부른다.
최근해 출시된 안정판 버젼은 6.0으로 이름은 스퀴지 (Squeeze)다.
작업 셈틀은 2.6.39 64 비트 AMD 커널, 노트북은 2.6.39 32 비트 인텔 커널이다.
시스템을 설치할 때 꼭 /var만 다루는 파티션을 만들어야 한다.
하드웨어 이상이나 소프트웨어의 오류로 커널이나 특정 프로그램이
수백 메가에서 수백 기가 크기의 오류 데이타를 /var의 로그(log)
파일들에 저장하는 일이 벌어진다.
하드 디스크가 꽉차 100% 이르면 어떻게 될까?
2012/07/09 jhead로 디지탈 사진의 EXIF tag 데이타 읽기
2012/05/19 VLC media player로 DVD 영화 보기
2012/05/07 캐논 카메라의 RAW 파일 처리하기
2012/05/01 파일 확장자 바꾸기
2012/04/02 구글 크롬 베타 지우고 안정판 깔기
2011/12/05 Xorg 되풀이 글쇠 (sticky key) 켜기
2011/11/27 http://kldp.org/node/124846#comment-564803">ssh 호스트(host)에 접속하며 비밀번호 붙이기
2011/11/27 구글 크롬 사이트의 광고 딱지(banner) 막기
2011/11/21 Xorg의 ssh 터미날에서 한글/영어 사용하기
2011/11/21 구글 크롬 16.0.912.41 beta에서 자바 플러그인 새판깔기(upgrade)
2011/11/20 APT - 엮임을 깨고 꾸러미 지우기
2011/11/19 구글 크롬 15.x를 쓰면 베타(beta)를 설치하자
2011/11/19 HP LaserJet P1005 프린터 설치
2011/11/17 커널 모듈 옵션 보기/바꾸기
2011/11/16 Xorg DPI 바꾸기
2011/11/15 bash - 이전 프로그램 찾기 (history)
2011/11/15 grep - 글자(text) 파일에서만 낱말 찾기
2011/11/15 구글 크롬 줄임글쇠
2011/11/14 64 비트 AMD 리눅스에서 32 비트 인텔 커널 짓기
2011/11/13 /dev/mixer 파일이 없다?
2011/11/12 새 커널 짓기(build)
2011/11/11 콘키(Conky) - 시스템 정보 표시 프로그램
2011/11/10 사용자를 떼(group)에 넣기
2011/11/09 fluxbox- 글쇠판 줄임들 (keyboard shortcuts)
2011/11/05 세벌식 최종 입문기
2011/11/04 콜맥(Colemak)/드보락(dvorak)과 세벌식 최종의 IBus 설정
2011/11/03 Leopold FC200R Tenkeyless 키보드 수정
2011/11/02 Xorg에서 영어 키보드 배열 전환: 쿼티(qwerty), 드보락(dvorak), 콜맥(Colemak)
2011/10/30 fluxbox - 마우스 커서가 화면의 끝에 가면 다음 작업마당으로 넘어가는 기능 끄기
2011/10/25 USB 장치를 위한 xorg.conf 설정
2011/10/10 크롬 - 캐쉬 플래시 (flv) 파일 읽기
2011/10/03 djvu 파일 보기
2011/10/03 rar 파일 풀기
2011/09/24 부모 프로세스가 끝나도 자식인 바탕 (Background) 프로세스 유지하기
2011/09/14 libreoffice 설치
2011/09/08 크롬 - java 플러그인 설치
2011/09/08 캐논 디지탈 카메라 이미지 읽기
2011/08/27 디렉토리 이름 길이 자동조정 프롬프트
2011/08/25 ipython
2011/08/22 Vim 사용하기
2011/08/18 VirtualBox - 손 기계 /etc/network/interfaces 파일 추가
2011/08/14 그래픽 지원 Vim 설치
2011/08/13 패키지 관리하기
2011/08/13 VirtualBox - 손 지원품, 네트워크 설정 내용 추가
2011/08/12 sudo 에서 비밀번호 입력 끄기
2011/08/12 Xorg 환경과 한글/영어 입력기(ibus) 설정
2011/08/12 시스템 정보 출력 프로그램: hardinfo, gkrellm
2011/08/11 Exim4 메일 서버로 내부(local) 메일과 외부 발송 이메일 처리
2011/08/10 파일(ftp) 서버와 OpenSSH 서버 설치
2011/08/08 lftp - 파일 송수신 프로그램
2011/08/06 VirtualBox 4.1 손 (guest) 기계 설치 및 네트워크 설정
2011/07/xx 구글 크롬 설치
2011/07/xx fluxbox 윈도우 관리기
jhead로 디지탈 사진의 EXIF tag 데이타 읽기
(07/09/2012;)
깔기는 $ sudo aptitude install jhead
사용 예
$ jhead IMG_0002.JPG
File name    : IMG_0002.JPG
File size    : 3801252 bytes
File date    : 2012:07:08 12:41:22
Camera make  : Canon
Camera model : Canon EOS DIGITAL REBEL XS
Date/Time    : 2012:07:08 12:41:21
Resolution   : 3888 x 2592
Flash used   : No
Focal length : 30.0mm  (35mm equivalent: 49mm)
CCD width    : 22.25mm
Exposure time: 0.0100 s  (1/100)
Aperture     : f/7.1
ISO equiv.   : 200
Whitebalance : Auto
Metering Mode: pattern
Exposure     : program (auto)
VLC media player로 DVD 영화 보기
(05/19/2012;)
VLC media player로 DVD 디스크에 있는 영화를 보려면 libdvdcss2 꾸러미를 따로 깔아야한다.
"deb http://www.deb-multimedia.org squeeze main non-free"를
/etc/apt/sources.list 파일에 더하거나 list 파일을 sources.list.d 디렉토리에
아래와 같이 만든다.
$ more /etc/apt/sources.list.d/deb-mutimeia.list
#  libdvdcss2
deb <a href="http://www.deb-multimedia.org" rel="nofollow">http://www.deb-multimedia.org</a> squeeze main non-free
$ sudo aptitude update
$ sudo aptitude install  libdvdcss2
The following NEW packages will be installed:
  libdvdcss2
0 packages upgraded, 1 newly installed, 0 to remove and 91 not upgraded.
Need to get 37.1 kB of archives. After unpacking 106 kB will be used.
WARNING: untrusted versions of the following packages will be installed!

Untrusted packages could compromise your system's security.
You should only proceed with the installation if you are certain that
this is what you want to do.

  libdvdcss2

Do you want to ignore this warning and proceed anyway?
To continue, enter "Yes"; to abort, enter "No": Yes
Get:1 <a href="http://www.deb-multimedia.org/" rel="nofollow">http://www.deb-multimedia.org/</a> squeeze/main libdvdcss2 amd64 1.2.10-0.3 [37.1 kB]
Fetched 37.1 kB in 1s (22.4 kB/s)
Selecting previously deselected package libdvdcss2.
(Reading database ... 106238 files and directories currently installed.)
Unpacking libdvdcss2 (from .../libdvdcss2_1.2.10-0.3_amd64.deb) ...
Setting up libdvdcss2 (1.2.10-0.3) ...
파일 확장자 바꾸기
(05/01/2012;)
현재 디렉토리에 있는 모든 .jpeg로 끝나는 파일을 .jpg으로 바꾼다.
$ rename s/.jpeg/.jpg/ *.jpeg
구글 크롬 베타 지우고 안정판 깔기
(04/02/2012;)
$ sudo aptitude remove google-chrome-beta
$ sudo dpkg -i google-chrome-stable_current_amd64
google-chrome-stable_current_amd64 (1).deb google-chrome-stable_current_amd64.deb
penguin@theblue:~/Downloads$ sudo dpkg -i google-chrome-stable_current_amd64.deb
(Reading database ... 106096 files and directories currently installed.)
Unpacking google-chrome-stable (from google-chrome-stable_current_amd64.deb) ...
Setting up google-chrome-stable (18.0.1025.142-r129054) ...
update-alternatives: using /usr/bin/google-chrome to provide /usr/bin/x-www-browser (x-www-browser) in auto mode.
update-alternatives: using /usr/bin/google-chrome to provide /usr/bin/gnome-www-browser (gnome-www-browser) in auto mode.
Processing triggers for menu ...
Processing triggers for man-db ...
Xorg되풀이 글쇠 (sticky key) 켜기
(12/05/2011;)
되풀이 글쇠 기능을 켜면 쉬프트 글쇠를 두번 눌러 영어 큰글자를 이어서 칠 수 있다.
CapsLock을 지움 (Backspace)으로 부리는 콜맥 글쇠판에 필요하다.
"HELLO"를 칠때 [쉬프트][쉬프트]hello[쉬프트]를 치면 된다.
Xorg를 시작할 때
$ startx -- +accessx
그다음 쉬프트 글쇠를 다섯번 치면 되풀이 글쇠가 켜진다. 끄려면 쉬프트 글쇠를 다시 다섯번 친다.
localepurge - 꾸러미에서 다른 언어 글뭉치 지우기
(12/04/2011;)
데비안 꾸러미는 유니코드에서 지원하는 많은 언어의 글뭉치를 가지고 있다. 글쓴이는 한글과 영어만
사용하기 때문에 꾸러미를 깔때 다른 언어의 글뭉치는 지운다. localepurge는 꾸러미가 깔리면 사용자가 정한
언어들의 글뭉치만 남겨 놓는다.
$ sudo aptitude install localepurge
언어 환경 창이 뜨고 시스템에서 사용하는 언어를 고른다.
Xorg의 ssh 터미날에서 한글/영어 사용하기
(11/21/2011;)
ssh 터미날에서 다음과 같이 프로그램 보다 ibus를 먼저 실행한다.
$ (ibus-daemon -xd; google-chrome;)
그러면 손 Xorg 윈도우 관리기에 패널이 있으면 ibus 아이콘이 더해진다.
[기본 ibus][손 ibus]
구글 크롬 15.x를 쓰면 베타(beta)를 설치하자
(11/19/2011;)
15.x를 쓰면서 가끔 시스템 메모리를 모두 잡아먹는 버그를 겪었다.
버전 15.0.874.106를 쓴다면 이 버그를 수정한 베타판을(16.0.912.41 beta) 설치하자.
$ sudo aptitude install google-chrome-beta
HP LaserJet P1005 프린터 설치
(11/19/2011;11/20/2011;)
Lenny에서는 설치가 잘되었지만 스퀴지로 올라오고 두번의 업그레이드를 하면서
몇일 전에는 인쇄를 못하게 되었다. 글쓴이가 찾은 방법은
드라이버를 지원하는 프린터른 cups와 cups-client만 깐다.
(11/20/2011;)
 sudo aptitude install cups cups-client
The following NEW packages will be installed:
  cups cups-client cups-common{a} cups-driver-gutenprint{a} cups-ppdc{a}
  foomatic-db{a} foomatic-db-engine{a} foomatic-filters{a}
  ghostscript-cups{a} libcups2{a} libcupscgi1{a} libcupsdriver1{a}
  libcupsmime1{a} libcupsppdc1{a}
0 packages upgraded, 14 newly installed, 0 to remove and 15 not upgraded.
Need to get 6,991 kB of archives. After unpacking 44.0 MB will be used.
Do you want to continue? [Y/n/?]
$ sudo aptitude cups cups-client hplip hplip-cups $ hp-setup
커널 모듈 옵션 보기/바꾸기
(11/17/2011;)
커널 모듈이 어떤 옵션들을 사용하는지 보려면
'modinfo [모듈 이름]'을 친다.
$ sudo modinfo psmouse
filename:       /lib/modules/2.6.39amd64hp/kernel/drivers/input/mouse/psmouse.ko
license:        GPL
description:    PS/2 mouse driver
author:         Vojtech Pavlik <vojtech@suse.cz>
srcversion:     B965E78CC6F3D4A67903D49
alias:          serio:ty05pr*id*ex*
alias:          serio:ty01pr*id*ex*
depends:
intree:         Y
vermagic:       2.6.39amd64hp SMP preempt mod_unload modversions
parm:           force_elantech:Force the Elantech PS/2 protocol extension to be used, 1 = enabled, 0 = disabled (default). (bool)
parm:           proto:Highest protocol extension to probe (bare, imps, exps, any). Useful for KVM switches. (proto_abbrev)
parm:           resolution:Resolution, in dpi. (uint)
parm:           rate:Report rate, in reports per second. (uint)
parm:           smartscroll:Logitech Smartscroll autorepeat, 1 = enabled (default), 0 = disabled. (bool)
parm:           resetafter:Reset device after so many bad packets (0 = never). (uint)
parm:           resync_time:How long can mouse stay idle before forcing resync (in seconds, 0 = never). (uint)
커널 모듈은 /sys/module 디렉토리 데이타를 저장한다. 모듈의 옵션을 보려면
'cat /sys/module/[모듈 이름]/parameters/[옵션 이름]'
또는
'cat /sys/module/[모듈 이름]/parameters/*'는 모듈의 모든 옵션 값을 보여준다.
$ cat /sys/module/psmouse/parameters/*
N
ImPS/2
60
5
1200
5
N

$ more /sys/module/psmouse/parameters/*
::::::::::::::
/sys/module/psmouse/parameters/force_elantech
::::::::::::::
N
::::::::::::::
/sys/module/psmouse/parameters/proto
::::::::::::::
ImPS/2
::::::::::::::
/sys/module/psmouse/parameters/rate
::::::::::::::
60
::::::::::::::
/sys/module/psmouse/parameters/resetafter
::::::::::::::
5
::::::::::::::
/sys/module/psmouse/parameters/resolution
::::::::::::::
1200
::::::::::::::
/sys/module/psmouse/parameters/resync_time
::::::::::::::
5
::::::::::::::
/sys/module/psmouse/parameters/smartscroll
::::::::::::::
N
부팅시 모듈의 옵션에 값을 주려면 '/etc/modprobe.d' 디렉토리에
옵션 파일을 만든다.
$ more psmouse.conf
options psmouse proto=imps rate=60 smartscroll=0 resolution=1200
Xorg DPI 바꾸기
(11/16/2011;)
Xorg의 DPI가 xorg.conf에 정한 값으로 바뀌지 않는다면,
'startx -- -dpi [숫자]'로 Xorg를 시작한다.
$ startx -- -dpi 95
하드웨어 장치 고장 확인하기
(11/16/2011;)
하드웨어 장치가 고장이 나면 커널이 오류 메시지를 기록하기 시작한다.
아래는 글쓴이 노트북의 무선 랜카드가 고장이 나서 드라이버인 ipw2200가
보낸 오류 메시지들이다.
Nov 14 21:45:43 laptop kernel: [17808.484107] ipw2200: Failed to send
SYSTEM_CONFIG: Already sending a command.
Nov 14 21:45:55 laptop kernel: [17821.475375] ipw2200: Failed to send
SYSTEM_CONFIG: Already sending a command.
Nov 14 21:46:12 laptop kernel: [17837.664632] ipw2200: Failed to send
SYSTEM_CONFIG: Already sending a command.
Nov 14 21:46:26 laptop kernel: [17852.091464] ipw2200: Failed to send
SYSTEM_CONFIG: Already sending a command.
Nov 14 21:46:40 laptop kernel: [17865.721653] ipw2200: Failed to send
SYSTEM_CONFIG: Already sending a command.
Nov 14 21:47:00 laptop kernel: [17886.102543] ipw2200: Failed to send
SYSTEM_CONFIG: Already sending a command.
bash - 이전 프로그램 찾기 (history)
(11/15/2011;)
$ history | grep [프로그램 이름/낱말]
$ ![수]
아래 예에서 'ssh penguin@192.168.1.102'을 다시 실행한다.
$ history | grep ssh
  216  ssh <a href="mailto:penguin@192.168.1.102" rel="nofollow">penguin@192.168.1.102</a>
  218  ssh <a href="mailto:penguin@192.168.1.102" rel="nofollow">penguin@192.168.1.102</a>
  502  history | grep ssh
$ !216
Ctrl+r은 글자로 시작하는 프로그램 실행 문장을 찾는다. 오른 화살표를
누르면 문장 전체가 쉘로 보내진다.
(reverse-i-search)`v': vim /home/penguin/Maintain/clipboard.txt
$ vim /home/penguin/Maintain/clipboard.txt
grep - 글자(text) 파일에서만 낱말 찾기
(11/15/2011;)
function findTextInAsciiFiles {
# usage: findTextInAsciiFiles DIRECTORY NEEDLE_TEXT
find "$1" -type f -exec grep -l "$2" {} \; -exec file {} \; | grep text
}
/dev/mixer 파일이 없다?
(11/13/2011)
ALSA 소리 드라이버 안에서 OSS 소리 장치 파일들을 사용하는 프로그램을 위해서는
snd_pcm_oss 모듈을 올려야 한다. /dev/{audio, adsp, dsp, mixer}파일들이
만들어진다. fbpanel은 "can't open /dev/mixer"를 뿌리고 시작하다 멈춘다.
/etc/modules 파일에 snd_pcm_oss를 넣어주면 시스템이 시작할때
ALSA와 OSS 소리 드라이버 커널 모듈들이 모두 올려진다.
64 비트 AMD 리눅스에서 32 비트 인텔 커널 짓기
(11/14/2011;)
커널 짓는 과정은 새 커널 짓기와 같다.
커널 설정을 끝내고 크로스 컴파일(cross compile) 환경을 만든다.
지은 시스템: 64 비트 AMD 2.6.39
목표 시스템: 32 비트 인텔 Pentium M 1.85 GHz
CFLAGS는 gcc가 컴파일시 사용하는 옵션을 담는다.
pentium-m은 인텔 Pentium M 프로세서용 코드를 만든다.
-O2는 기계 코드 생성 최적 수준
-pipe는 컴파일하는 속도를 빨리한다.
-fomit-frame-pointer 기계 코드 생성 최적화를 조정한다.
CXXFLAGS는 g++가 사용하는 옵션을 담는 변수
$ export CFLAGS="-march=pentium-m -O2 -pipe -fomit-frame-pointer"
$ export CXXFLAGS="${CFLAGS}"
$ DEB_HOST_ARCH=i386 setarch i386 make-kpkg --revision "1" --cross-compile\
 - --arch=i386 --us --uc --initrd --rootcmd fakeroot kernel-image kernel-headers
make-kpkg가 "make oldconfig"를 실행해서 커널 옵션들을 묻는다. 전부 엔터 글쇠를 친다.
커널 짓기가 끝나면 두개의 커널 꾸러미가 /usr/src에 만들어 진다.
6.9M Nov 14 03:59 linux-headers-2.6.39_1_i386.deb
 15M Nov 14 03:58 linux-image-2.6.39_1_i386.deb
노트북에 두 꾸러미 파일을 올리고
'sudo dpkg -i linux-headers-2.6.39_1_i386.deb linux-image-2.6.39_1_i386.deb'을
실행해서 새 커널을 설치한다.
32 비트 인텔 커널 파일들 3개가 생성된다.
5.4M Nov 14 04:09 initrd.img-2.6.39
1.6M Nov 14 03:57 System.map-2.6.39
3.6M Nov 14 03:57 vmlinuz-2.6.39

8.4M Nov 12 19:15 initrd.img-2.6.32-5-686
6.0M Jul 14 13:44 initrd.img-2.6.26-2-686
908K Jun 12 01:35 System.map-2.6.26-2-686
1.5M Jun 12 01:34 vmlinuz-2.6.26-2-686
시스템을 다시 시작하고 2.6.39 커널로 부팅한다.
"Linux version 2.6.39 (2.6.39) (penguin@theblue) (gcc version 4.4.5 (Debian 4.4.5-8
) ) #1 PREEMPT Mon Nov 14 03:36:14 KST 2011"
커널을 진 셈틀 정보다.
"Hewlett-Packard HP Compaq nc6220 (EA766UC)/308A, BIOS 68DTU Ver. F.16 07/24/2
009"
커널이 바이오스에서 노트북 정보를 읽어온다.
[    0.000000] Initializing cgroup subsys cpuset
[    0.000000] Initializing cgroup subsys cpu
[    0.000000] Linux version 2.6.39 (2.6.39) (penguin@theblue) (gcc version 4.4.5 (Debian 4.4.5-8
) ) #1 PREEMPT Mon Nov 14 03:36:14 KST 2011
[    0.000000] BIOS-provided physical RAM map:
[    0.000000]  BIOS-e820: 0000000000000000 - 000000000009fc00 (usable)
[    0.000000]  BIOS-e820: 000000000009fc00 - 00000000000a0000 (reserved)
[    0.000000]  BIOS-e820: 00000000000e0000 - 0000000000100000 (reserved)
[    0.000000]  BIOS-e820: 0000000000100000 - 000000003f7d0000 (usable)
[    0.000000]  BIOS-e820: 000000003f7d0000 - 000000003f7efc00 (reserved)
[    0.000000]  BIOS-e820: 000000003f7efc00 - 000000003f7fb000 (ACPI NVS)
[    0.000000]  BIOS-e820: 000000003f7fb000 - 000000003f800000 (reserved)
[    0.000000]  BIOS-e820: 00000000e0000000 - 00000000f0000000 (reserved)
[    0.000000]  BIOS-e820: 00000000fec00000 - 00000000fec02000 (reserved)
[    0.000000]  BIOS-e820: 00000000fed20000 - 00000000fed9b000 (reserved)
[    0.000000]  BIOS-e820: 00000000feda0000 - 00000000fedc0000 (reserved)
[    0.000000]  BIOS-e820: 00000000ffb00000 - 00000000ffc00000 (reserved)
[    0.000000]  BIOS-e820: 00000000fff00000 - 0000000100000000 (reserved)
[    0.000000] Notice: NX (Execute Disable) protection cannot be enabled: non-PAE kernel!
[    0.000000] DMI 2.3 present.
[    0.000000] DMI: Hewlett-Packard HP Compaq nc6220 (EA766UC)/308A, BIOS 68DTU Ver. F.16 07/24/2
009
새 커널 짓기(build)
(11/11/2011;11/12/2011;)
시스템 하드웨어에 문제가 있거나 최대의 성능을 원할 때 커널 소스를
내려받아서 만든다. 글쓴이가 사용하는 작업 셈틀의 커널 버전은
2.6.32-5 였다.
시스템 커널 버전을 보려면
$ uname -r
2.6.39amd64hp
11월 11일 2.6.39 커널을 만들어 시스템을 업그레이드(upgrade)하였다.
커널 짓는 순서는 다음과 같다.
1. 커널을 처음 짓는 다면 아래 꾸러미들을 설치한다.
$ sudo apt-get install fakeroot bzip2 kernel-package libncurses-dev
2. 새 커널 소스를 내려받는다.
$ sudo aptitude install linux-source-2.6.39
3. src 떼에 사용자를 등록한다.
$ cd /usr/src
4. 압축된 소스 파일을 푼다.
$ tar xjvf linux-source-2.6.39.tar.bz2
5. 작업 디렉토리 링크를 만든다.
$ ln -s linux-source-2.6.39 linux
6. 작업 디렉토리로 들어간다.
$ cd linux
7. 소스를 청소한다.
$ make clean
$ make mrproper
8.현재 사용하는 커널의 설정 파일을 복사한다.
$ cp /boot/config-`uname -r` .config
9. 메뉴 설정을 시작
$ make menuconfig
9.1. “Load an Alternate Configuration File”로 가서 .config을 읽어온다.
9.2. “Processor type and features --->"으로 간다.
9.3. “Preemption Model (Voluntary Kernel Preemption (Desktop)) --->”으로 간다.
9.3.1. “Preemptible Kernel (Low-Latency Desktop)"을 선택한다.
9.4. “Timer frequency (250 HZ) --->”로 간다.
9.4.1 “300 HZ”를 선택한다.
9.5. “Select an Alternative Configuration File"로 간다.
9.5.1 ok를 누르면 menuconfig가 끝난다.
10. 새 설정 파일을 현재 것을 비교한다.
$ diff /boot/config-`uname -r` .config
11. 시스템에 꼭맞는 gcc 컴파일러 옵션들을 설정한다.
CPU 종류, 코드 생성 조건을 정한다. 정확한 CPU 이름을 알려면
'cat /proc/cpuinfo'를 실행한다. 둘 이상의 프로세서가 있는
CPU는 프로세서가 0부터 시작해 정보를 보여준다. 4 코어라면
프로세서가 0, 1, 2, 3이 된다.
글쓴이의 CPU는 "AMD Athlon(tm) 64 X2 Dual Core Processor 4800+"이다.
프로세서가 두개다.
processor	: 0
vendor_id	: AuthenticAMD
cpu family	: 15
model		: 107
model name	: AMD Athlon(tm) 64 X2 Dual Core Processor 4800+
stepping	: 1
cpu MHz		: 1000.000
cache size	: 512 KB
physical id	: 0
siblings	: 2
core id		: 0
cpu cores	: 2
apicid		: 0
initial apicid	: 0
fpu		: yes
fpu_exception	: yes
cpuid level	: 1
wp		: yes
flags		: fpu vme de pse tsc msr pae mce cx8 apic sep mtrr pge mca cmov pat pse36
clflush mmx fxsr sse sse2 ht syscall nx mmxext fxsr_opt rdtscp lm 3dnowext 3dnow rep_good
nopl extd_apicid pni cx16 lahf_lm cmp_legacy svm extapic cr8_legacy 3dnowprefetch lbrv
bogomips	: 1999.35
TLB size	: 1024 4K pages
clflush size	: 64
cache_alignment	: 64
address sizes	: 40 bits physical, 48 bits virtual
power management: ts fid vid ttp tm stc 100mhzsteps

processor	: 1
vendor_id	: AuthenticAMD
cpu family	: 15
이 CPU에 맞는 gcc 옵션은 "-march=k8" 또는 "-march=athlon64"
-O2는 코드 생성 조건
-pipe는 컴파일 속도를 빠르게 한다
-fomit-frame-pointer는 코드의 크기를 작게 한다.
옵션에 대한 자세한 내용은 http://www.gentoo.org/doc/en/gcc-optimization.xml과
gcc 안내서를 보면 된다.
"CONCURRENCY_LEVEL=2"는 코어 두개를 병렬로 실행해 컴파일을 하라고 make에게 알린다.
코어의 숫자에서 +2 사이 숫자를 주어 만들기 속도를 빨리한다.
아래 코드를 bash에서 치거나 ~/.bashrc에 저장한 뒤 '. ~/.bashrc'를 친다.
CFLAGS="-march=athlon64 -O2 -pipe -fomit-frame-pointer"
CXXFLAGS="${CFLAGS}"
CONCURRENCY_LEVEL=2
export CFLAGS CXXFLAGS CONCURRENCY_LEVEL
12. 데비안 꾸러미를 만들기 위해 커널 소스를 청소한다.
make-kpkg clean
13. 소스를 컴파일해서 커널과 데비안 꾸러미들을 만든다.
13.1 글쓴이가 첫번째로 커널 만들기를 했을 때
$ fakeroot make-kpkg --append-to-version "-core2" --revision "1"
--us --uc --initrd kernel_image kernel_headers
13.2 글쓴이가 두번째로 커널 만들기를 했을 때는 커널 헤더 꾸러미를 만들지 않았다.
$ fakeroot make-kpkg --append-to-version "amd64hp" --revision "1"
--us --uc --initrd kernel-image
14. 새 커널 꾸러미들을 설치한다.
$ cd ..
$ sudo dpkg -i linux-image-2.6.32-core2_1_amd64.deb
linux-headers-2.6.32-core2_1_amd64.deb
13.1로 /boot에 config-2.6.39-core2, initrd.img-2.6.39-core2,
System.map-2.6.39-core2,vmlinuz-2.6.39-core2 파일이 만들어졌다.
/lib/modules/2.6.39-core2 디렉토리가 만들어졌다.
///
콘키(Conky) - 시스템 정보 표시 프로그램
(11/11/2011;)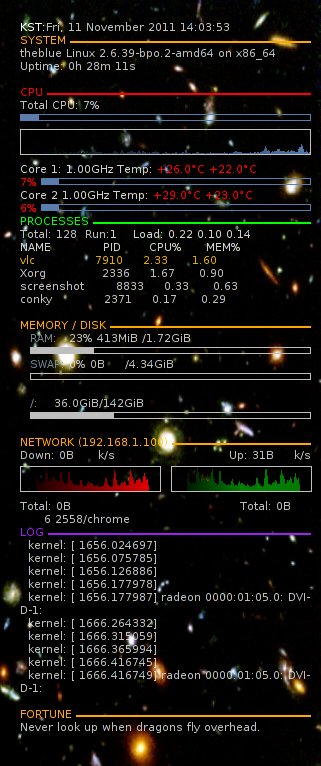
설치는
$ sudo aptitude install conky
~/.conkyrc 파일을 만든다. 글쓴이의 파일은 아래와 같다.
이 파일에서 주의할 점은 /var/log/messages 파일 읽기 가능한지 확인을 해야한다.
콘키는 Xorg가 사용하는 색 이름을 인식한다.
http://en.wikipedia.org/wiki/X11_color_names
# UBUNTU-CONKY
# A comprehensive conky script, configured for use on
# Ubuntu / Debian Gnome, without the need for any external scripts.
#
# Based on conky-jc and the default .conkyrc.
# INCLUDES:
# - tail of /var/log/messages
# - netstat shows number of connections from your computer and application/PID making it. Kill spyware!
#
# -- Pengo
#

# Create own window instead of using desktop (required in nautilus)
own_window yes
own_window_type override
own_window_transparent yes
own_window_hints undecorated,below,sticky,skip_taskbar,skip_pager

# Use double buffering (reduces flicker, may not work for everyone)
double_buffer yes

# fiddle with window
use_spacer right
# Use Xft?
use_xft yes
xftfont DejaVu Sans:size=8
xftalpha 0.8
text_buffer_size 2048

# Update interval in seconds
update_interval 3.0

# Minimum size of text area
# minimum_size 250 5

# Draw shades?
draw_shades no

# Text stuff
draw_outline no # amplifies text if yes
draw_borders no

uppercase no # set to yes if you want all text to be in uppercase

# Stippled borders?
stippled_borders 3
# border margins
border_margin 9

# border width
border_width 10

# Default colors and also border colors, grey90 == #e5e5e5
default_color grey

own_window_colour brown
own_window_transparent yes

# Text alignment, other possible values are commented
#alignment top_left
alignment top_right
#alignment bottom_left
#alignment bottom_right

# Gap between borders of screen and text
gap_x 10
gap_y 10
# stuff after 'TEXT' will be formatted on screen

TEXT
$color
${color white}${time %Z}:${color }${time %a, %e %B %G %H:%M:%S}
${color orange}SYSTEM ${hr 2}$color
$nodename $sysname $kernel on $machine
Uptime: $uptime

${color red}CPU ${hr 2}$color
Total CPU: ${cpu cpu0}%
${color 597DB2}${cpubar}$color
${cpugraph 000000 597DB2}
${color lightgrey}Core 1: ${freq_g 1}GHz Temp: ${color red}${exec sensors | grep Core0 | awk '{print $3}' | tr '\n' ' '}
${cpu cpu1}% ${color 597DB2}${cpubar cpu1}$color
${color lightgrey}Core 2 ${freq_g 2}GHz Temp: ${color red}${exec sensors |\
grep Core1 | awk '{print $3}' | tr '\n' ' '}
${cpu cpu2}% ${color 597DB2}${cpubar cpu1}$color
${color green}PROCESSES ${hr 2}$color
Total: $processes Run:${color lightgrey}${running_processes} Load: ${loadavg}
# ${cpugraph 000000 ffffff}
NAME             PID       CPU%      MEM%
${color ddaa00}${top name 1} ${top pid 1}   ${top cpu 1}    ${top mem 1}$color
${top name 2} ${top pid 2}   ${top cpu 2}    ${top mem 2}
${top name 3} ${top pid 3}   ${top cpu 3}    ${top mem 3}
${top name 4} ${top pid 4}   ${top cpu 4}    ${top mem 4}

${color orange}MEMORY / DISK ${hr 2}$color
${offset 10}${color slate grey}RAM:  ${color } $memperc% $mem/$memmax
${offset 10}${membar}
${offset 10}${color slate grey}SWAP: ${color }$swapperc% $swap/$swapmax
${offset 10}${swapbar}

${offset 10}${color slate grey}/:    ${color }${fs_used /}/${fs_size /}
${offset 10}${fs_bar}

${color orange}NETWORK (${addr eth1}) ${hr 2}$color
Down: $color${downspeed eth0} k/s ${alignr}Up: ${upspeed eth1} k/s
${downspeedgraph eth1 25,140 000000 ff0000} ${alignr}${upspeedgraph eth1

25,140 000000 00ff00}$color
Total: ${totaldown eth0} ${alignr}Total: ${totalup eth0}
${execi 30 netstat -ept | grep ESTAB | awk '{print $9}' | cut -d: -f1 | sort | uniq -c | sort -nr}
${color purple}LOG ${hr 2}$color
# Permission denied
${execi 30 tail -n10 /var/log/messages | awk '{print " ",$5,$6,$7,$8,$9,$10}' | fold -w50}

${color orange}FORTUNE ${hr 2}$color
${execi 120 fortune -s | fold -w50}
사용자를 떼(group)에 넣기
/var/log/messages 파일은 왕사용자 root와 adm 떼에 속한 사용자들만
읽을 수 있다.
-rw-r----- 1 root adm 397237 Nov 10 16:39 /var/log/messages
penguin이란 사용자에게 adm 떼 권한을 주려면 아래 명령을 친다.
주의할 점은 'id'로 사용자가 속한 보고 두 떼가 넘으면 이들을 모두
넣어준다.
$ id penguin
uid=1000(penguin) gid=1000(penguin) groups=1000(penguin),24(cdrom),25(floppy),
29(audio),30(dip),40(src),44(video),46(plugdev),108(netdev),109(bluetooth),114(scanner)
adduser가 사용하기 쉽다.
$ sudo adduser penguin admin
아래와 같이 하면
$ sudo usermod -G adm penguin
$ id penguin
uid=1000(penguin) gid=1000(penguin) groups=4(adm)
떼들이 adm 떼로 바뀐다. 어째 이런일이!!
$ sudo usermod -G cdrom,floppy,audio,dip,src,video,plugdev,netdev,
bluetooth,scanner,adm penguin
$ id penguin
uid=1000(penguin) gid=1000(penguin) groups=1000(penguin),4(adm),24(cdrom),25(floppy),
29(audio),30(dip),40(src),44(video),46(plugdev),108(netdev),109(bluetooth),114(scanner)
콜맥(Colemak)/드보락(dvorak)과 세벌식 최종의 IBus 설정
(11/08/2011; 11/04/2011;)
IBus 메뉴의 [Advanced] - [Keyboard Layout]
Use system keyboard layout을 끈다.
아마 콘솔은 쿼티이고 Xorg는 드보락이라 그런걸까 싶다.
Leopold FC200R Tenkeyless 키보드 수정
(11/03/2011;)
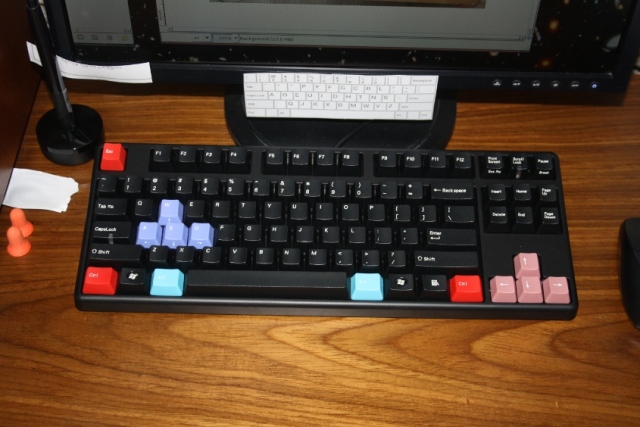
키 갯수가 87으로 USB나 PS/2로 연결할 수 있다. USB로 연결했다.
ScrollLock의 LED가 전혀 들어오지 않아서 xmodmap과 xev로 상태를
확인해 보니 ScrollLock 설정이 되있지 않았다.
$ xmodmap -pm
xmodmap:  up to 4 keys per modifier, (keycodes in parentheses):

shift       Shift_L (0x32),  Shift_R (0x3e)
lock        Caps_Lock (0x25)
control     Control_L (0x42),  Control_R (0x69)
mod1        Alt_L (0x40),  Alt_R (0x6c),  Meta_L (0xcd)
mod2        Num_Lock (0x4d)
mod3        Scroll_Lock (0x4e)
mod4        Super_L (0x85),  Super_R (0x86),  Super_L (0xce),  Hyper_L (0xcf)
mod5        ISO_Level3_Shift (0x5c),  Mode_switch (0xcb)
mod3가 공백이었다.
ScrollLock키를 설정을 해보았다.
$ xmodmap -e "add mod3 = Scroll_Lock"
ScrollLock키을 누르면 LED가 켜졌다.
왼쪽 Ctrl키와 CapsLock키 위치를 바꾸는 xmodmap 데이타 파일 "~/.Xmodmap"을
아래와 같이 만들었다.
! "ScrollLock" was not working.
! turn on the LED Scroll Lock key
add mod3 = Scroll_Lock

!
! Swap Caps_Lock and Control_L
!
remove Lock = Caps_Lock
remove Control = Control_L
keysym Control_L = Caps_Lock
keysym Caps_Lock = Control_L
add Lock = Caps_Lock
add Control = Control_L
Xorg를 실행하면 ScrollLock과 CapsLock키 상태가 바뀌도록
"~/.xinitrc"에 xmodmap 실행 코드를 넣는다.
# load custom key maps
usermodmap=$HOME/.Xmodmap

if [ -f $usermodmap ]; then
    xmodmap $usermodmap
fi
Xorg에서 영어 키보드 배열 전환: 쿼티(qwerty), 드보락(dvorak), Colemak
(11/02/2011; 11/06/2011;)
현재 키보드 자판을 보려면
$ setxkbmap -print
xkb_keymap {
	xkb_keycodes  { include "evdev+aliases(qwerty)"	};
	xkb_types     { include "complete"	};
	xkb_compat    { include "complete"	};
	xkb_symbols   { include "pc+us+inet(evdev)"	};
	xkb_geometry  { include "pc(pc105)"	};
};
드보락으로 바꾸려면
$ setxkbmap dvorak
쿼티로 바꾸려면
$ setxkbmap us
Colemak
$ setxkbmap us -variant colemak
djvu 파일 보기
(10/3/2011;)
evince는 pdf 파일 읽기 프로그램이다. djvu 파일도 읽는다.
rar 파일 풀기
(10/3/2011;)
unrar 패키지를 설치한다.
$ sudo aptitude install unrar
rar 파일을 풀려면
$ unrar x file.rar
libreoffice 설치
(9/14/2011;)
스퀴지에서는 라이브리오피스를 백포트 (backport)로 제공한다.
/etc/apt/sources.list 파일에 백포트 사이트를 추가한다.
deb http://backports.debian.org/debian-backports squeeze-backports main
penguin@theblue:/etc/apt$ sudo aptitude -t squeeze-backports install libreoffice
The following NEW packages will be installed:
  libbase-java-openoffice.org{a} libjaxp1.3-java-gcj{a} libreoffice
  libreoffice-base{a} libreoffice-base-core{a} libreoffice-calc{a}
  libreoffice-common{ab} libreoffice-core{a} libreoffice-draw{a}
  libreoffice-emailmerge{a} libreoffice-filter-binfilter{a}
  libreoffice-filter-mobiledev{a} libreoffice-impress{a} libreoffice-java-common{a}
  libreoffice-math{a} libreoffice-report-builder-bin{a} libreoffice-style-galaxy{a}
  libreoffice-writer{a} libserializer-java-openoffice.org{a} libxerces2-java{a}
  libxerces2-java-gcj{a}
The following packages will be upgraded:
  ttf-opensymbol uno-libs3 ure{b}
3 packages upgraded, 21 newly installed, 0 to remove and 99 not upgraded.
Need to get 112 MB of archives. After unpacking 310 MB will be used.
The following packages have unmet dependencies:
  libreoffice-common: Conflicts: openoffice.org-common (< 1:3.3.0~) but 1:3.2.1-11+squeeze3 is installed.
  ure: Breaks: openoffice.org-core (< 1:3.3~) but 1:3.2.1-11+squeeze3 is installed.
The following actions will resolve these dependencies:

      Remove the following packages:
1)      openoffice.org
2)      openoffice.org-base
3)      openoffice.org-base-core
4)      openoffice.org-calc
5)      openoffice.org-common
6)      openoffice.org-core
7)      openoffice.org-draw
8)      openoffice.org-emailmerge
9)      openoffice.org-evolution
10)     openoffice.org-filter-binfilter
11)     openoffice.org-filter-mobiledev
12)     openoffice.org-gcj
13)     openoffice.org-gnome
14)     openoffice.org-gtk
15)     openoffice.org-help-en-us
16)     openoffice.org-help-ko
17)     openoffice.org-impress
18)     openoffice.org-java-common
19)     openoffice.org-math
20)     openoffice.org-officebean
21)     openoffice.org-report-builder-bin
22)     openoffice.org-style-galaxy
23)     openoffice.org-style-tango
24)     openoffice.org-thesaurus-en-us
25)     openoffice.org-writer
26)     python-uno

      Keep the following packages at their current version:
27)     libreoffice-emailmerge [Not Installed]

      Leave the following dependencies unresolved:
28)     libreoffice-writer recommends libreoffice-emailmerge
29)     openoffice.org-help-en-us recommends openoffice.org-core (> 1:3.2.1) | language-s
30)     openoffice.org-help-en-us recommends openoffice.org-java-common
31)     openoffice.org-help-ko recommends openoffice.org-core (> 1:3.2.1) | language-supp
32)     openoffice.org-help-ko recommends openoffice.org-java-common
33)     openoffice.org-l10n-ko recommends openoffice.org-core (> 1:3.2.1) | language-supp
34)     openoffice.org-writer recommends openoffice.org-filter-binfilter
35)     openoffice.org-writer recommends openoffice.org-java-common (>= 1:3.2.1~)
36)     openoffice.org-writer recommends openoffice.org-emailmerge
37)     openoffice.org-writer recommends openoffice.org-math
38)     openoffice.org recommends openoffice.org-filter-binfilter


Accept this solution? [Y/n/q/?] y
캐논 디지탈 카메라 이미지 읽기
(2011/9/8)
gtkam 프로그램을 사용하면 된다.
설치는
$ sudo aptitude install gtkam
gtkam을 실행하고 카메라에 usb 전선을 연결하고 켠다.
Camera -> Add camera 메뉴를 눌러 카메라 모델을 선택한다.
카메라를 찾으면 왼쪽에 카메라 이름이 나오고 오른쪽 윈도우에 이미지들이 뜬다.
필자의 카메라는 Canon EOS 1000D
캐논 카메라의 RAW 파일 데이타 파일 CR2 처리하기
(2012/05/07;)
ufraw 꾸러미를 깐다.
$ sudo aptitude install ufraw
The following NEW packages will be installed:
  desktop-file-utils{a} libgtkimageview0{a} ufraw
0 packages upgraded, 3 newly installed, 0 to remove and 54 not upgraded.
Need to get 759 kB of archives. After unpacking 2,310 kB will be used.
Do you want to continue? [Y/n/?] Y
Get:1 <a href="http://ftp.kr.debian.org/debian/" rel="nofollow">http://ftp.kr.debian.org/debian/</a> squeeze/main desktop-file-utils amd64 0.15-2 [59.5 kB]
Get:2 <a href="http://ftp.kr.debian.org/debian/" rel="nofollow">http://ftp.kr.debian.org/debian/</a> squeeze/main libgtkimageview0 amd64 1.6.4-1 [32.6 kB]
Get:3 <a href="http://ftp.kr.debian.org/debian/" rel="nofollow">http://ftp.kr.debian.org/debian/</a> squeeze/main ufraw amd64 0.16-3+b1 [667 kB]
Fetched 759 kB in 0s (1,204 kB/s)
Selecting previously deselected package desktop-file-utils.
(Reading database ... 106189 files and directories currently installed.)
Unpacking desktop-file-utils (from .../desktop-file-utils_0.15-2_amd64.deb) ...
Selecting previously deselected package libgtkimageview0.
Unpacking libgtkimageview0 (from .../libgtkimageview0_1.6.4-1_amd64.deb) ...
Selecting previously deselected package ufraw.
Unpacking ufraw (from .../ufraw_0.16-3+b1_amd64.deb) ...
Processing triggers for man-db ...
Processing triggers for gconf2 ...
Setting up desktop-file-utils (0.15-2) ...
Setting up libgtkimageview0 (1.6.4-1) ...
Setting up ufraw (0.16-3+b1) ...
localepurge: Disk space freed in /usr/share/locale: 684 KiB
localepurge: Disk space freed in /usr/share/man: 0 KiB
localepurge: Disk space freed in /usr/share/gnome/help: 0 KiB
localepurge: Disk space freed in /usr/share/omf: 0 KiB
localepurge: Disk space freed in /usr/share/doc/kde/HTML: 0 KiB

Total disk space freed by localepurge: 684 KiB


penguin@theblue:~/Pictures/temp$ ufraw
ufraw        ufraw-batch
디렉토리 이름 길이 자동조정 프롬프트
(08/27/2011)
http://lindesk.com/2009/03/customizing-the-terminal-the-prompt
위 사이트에 나온 내용을 참고로 ~/.bashrc 파일을 아래와 같이 수정했다.
디렉토리 경로가 길면 중간을 "..."로 처리한다.
_update_prompt()
{
    DIR=`pwd|sed -e "s!$HOME!~!"`
    if [ ${#DIR} -gt 30 ]
    then
        cur_dir=${DIR:0:12}...${DIR:${#DIR}-15}
    else
        cur_dir=$DIR
    fi
}

PROMPT_COMMAND=_update_prompt

# replace "\w" to "\$cur_dir"
if [ "$color_prompt" = yes ]; then
    PS1="${debian_chroot:+($debian_chroot)}\[\033[01;32m\]\u@\h\[\033[00m\]:\
[\033[01;34m\]\$cur_dir\[\033[00m\]\$ "
else
    PS1="${debian_chroot:+($debian_chroot)}\u@\h:\$cur_dir$ "
fi
unset color_prompt force_color_prompt
부모 프로세스가 끝나도 자식인 바탕 (Background) 프로세스 유지하기
그놈 터미날에서 oneko를 바탕 프로세스로 실행시켰다고 하자. 그놈 터미날을
끄면 이 프로세스에서 파생된 자식 프로세스들 모두 종료가 된다. 자식 프로세스를
부모 프로세스와 독립적으로 실행시킬려면
"nohub program&"을 입력한다.
$ nohub oneko&
oneko를 종료시키려면
$ pkill oneko
IPython은 대화형 (interactive) 파이선 쉘 프로그램이다.
파이선 프로그래밍에 도움이 되는 많은 기능들을 가지고 있다.
설치는 $ sudo aptitude install ipython
사용자의 키 입력 횟수를 줄여주는 기능인 자동 완성 (auto completion)을 지원한다.
파이선 라이브러리와 사용자 정의 변수 및 함수명 일부를 치고 탭을 누르면 관련된 함수,
변수들을 보여준다. 아래 예에서 f를 치고 탭을 눌러 관련 모듈, 기본 명령어, 현재
필자가 만든 시험용 함수들 이름까지 보여준다.function_a[b,c]
funcasargument.py는 시험용 함수가 정의된 파일.
sys 모듈의 내용들을 보는 예.
In [118]: f
f                  float              format             function_a
file               foo.txt            from               function_b
filter             foo_writable.txt   frozenset          function_c
finally            for                funcasargument.py

In [119]: sys.builtin_module_names.
sys.builtin_module_names.__add__
sys.builtin_module_names.__class__
sys.builtin_module_names.__contains__
sys.builtin_module_names.__delattr__
sys.builtin_module_names.__doc__
sys.builtin_module_names.__eq__
콘솔 데이타를 파일로 저장하기
save [파일명] [머리 줄]-[꼬리 줄] [줄 번호]
사용예 save funcasargument 106-115
In [106]: bool("Ni!")
Out[106]: True

In [107]: def f(n):
   .....:     return 3*n - 6
   .....:

In [108]: def g(n):
    return 5*n + 2
   .....:

In [110]: def (hn):
------------------------------------------------------------
   File "<ipython console>", line 1
     def (hn):
         ^
SyntaxError: invalid syntax


In [111]: def h(n):
   .....:     return -2*n + 17
   .....:

In [112]: def doto(value, func):
   .....:     return func(value)
   .....:

In [113]: print doto(7, f)
--------> print(doto(7, f))
15

In [114]: print doto(7, g)
--------> print(doto(7, g))
37

In [115]: print doto(7, h)
--------> print(doto(7, h))
3

In [116]: save funcasargument 106-115
The following commands were written to file `funcasargument.py`:
파일 실행 하기
run [파일 이름]
사용 예
In [117]: run funcasargument.py
15
37
3
 xinput --set-prop "Cypress USB Keyboard" "Device Enabled" 1
Warning: There are multiple devices matching 'Cypress USB Keyboard'.
To ensure the correct one is selected, please use the device ID, or prefix the
device name with 'pointer:' or 'keyboard:' as appropriate.

unable to find device Cypress USB Keyboard
penguin@theblue:~$ xinput --set-prop "pointer:Cypress USB Keyboard" "Device Enabled" 1
penguin@theblue:~$ xinput --set-prop "pointer:Cypress USB Keyboard" "Device Enabled" 0
| 첨부 | 파일 크기 |
|---|---|
| 72.36 KB | |
| 20.04 KB |
sudo 의 경우
/etc/sudoer 를 직접 건드리기보다는
/etc/group 의 sudo 그룹에 추가한 다음에 sudoer 파일에서 sudo 그룹을 NOPASSWD: ALL 로 설정하는 것이 좋지 않을까요?
뭐 사람마다 다르겠지만...
데비안 셋업 관련글은 잘 읽었습니다
좋은 글 공유해주셔서 감사합니다
lftp - 파일 송수신 프로그램
고맙습니다.
스퀴지(Squeeze)에 관한 내용은 앞으로 계속 여기에 올리려고 합니다.
--
디렉토리 전체를 올리고 내려받는 ftp 프로그램. lftp
설치 방법은
$ sudo apt-get install lftp
파일 올리기 권한이 있는 ftp 서버나 다른 컴퓨터가 있으면
$ lftp -u <계정 이름> <서버이름> 또는 <서버 IP>
접속이 성공하면
Passwd:
를 묻고 비밀번호를 입력하면 서버의 디렉토리로 들어간다. 예를 들면 필자의 스퀴지 노트북 (192.168.1.101)에 접속한 상태
lftp penguin@192.168.1.101:~>
mirror 명령어는 디렉토리 전체를 내려받는다.
mirror -R은 lftp를 실행한 디렉토리나 다른 디렉토리 파일을 올린다.
Devuan 1.0 (Debian without systemd)
amd64 station: AMD FX(tm)-6100 Six-Core Processor, 8 GB memory, 1 TB HDD
amd64 laptop: HP Touchsmart
글쇠판: 세벌 최종식, 콜맥 (Colemak)
꾸러미 관리하기 - APT (Advanced Package Tool)
꾸러미를 낮은 판으로 내리기(down grade)
(11/21/2011;)
'/etc/apt/preferences' 파일을 만든다.
$ sudo apt-get upgrade
엮임(dependency)을 깨고 꾸러미 지우기
(11/20/2011;)
시스템을 사용하면 꾸러미를 설치하고 관리해야 한다.
개인용으로 데비안 리눅스를 사용하면 최초로 시스템 설치시 자동으로 등록되는 수퍼 사용자 root
그리고 설치시에 등록하는 일반 사용자 2명이다. 예로, 일반 사용자 이름은 penguin으로 한다.
데비안은 APT란 꾸러미 관리 시스템을 제공한다. APT에는 aptitude, 'apt-'로 시작하는 명령어들, dpkg, synaptic Xorg 프로그램을 주로 사용한다.
현재 시스템에 설치된 모든 꾸러미를 알고 싶을 때는
$ sudo dpkg -l
아래는 위 명령어의 출력 내용 중 일부이다.
전체 꾸러미 갯수를 알고 싶으면
$ sudo dpkg -l | wc -l
'dpkg -l'이 위와 같이 줄 단위로 꾸러미 이름을 출력하면 파이프 '|' 기능으로
이 데이타를 'wc -l'에 넘겨 준다. wc는 텍스트 파일의 단어나 줄을 계산하는 프로그램이다.
-l은 파일의 전체 줄수를 구한다.
특정 꾸러미 이름을 알고 싶으면, 예를 들어 ftp 서버 프로그램으로 어떤 클라이언트, 서버 프로그램이
설치되어 있는가?
$ sudo dpkg -l | grep ftp
위 명령에서 'grep ftp'는 'ftp'란 단어를 검색한다. grep은 주어진 텍스트 데이터나 파일들에서
단어를 찾는 프로그램이다.
위 명령어의 출력 결과는 다음과 같다.
꾸러미에 대한 자세한 정보를 알려면
$ apt-cache show package-name
아래는 ftp 설명
꾸러미에 속한 파일들을 알려면
$ dpkg -L package-name
아래는 ftp의 내용이다.
이 꾸러미의 재미있는 점은 실제로 ftp란 실행 파일이 없고 다른 실행 파일과 스크립트의 링크로
구성되어있다.
ftp가 어디에 있는지 찾는다.
penguin@laptop:~$ whereis ftp
ftp: /usr/bin/ftp /usr/share/man/man1/ftp.1.gz
ftp의 파일 정보를 본다.
penguin@laptop:~$ ls -l /usr/bin/ftp
lrwxrwxrwx 1 root root 21 Jul 14 13:41 /usr/bin/ftp -> /etc/alternatives/ftp
penguin@laptop:~$ ls -l /etc/alternatives/ftp
lrwxrwxrwx 1 root root 19 Jul 14 13:41 /etc/alternatives/ftp -> /usr/bin/netkit-ftp
위 두 파일 정보에 따르면 ftp는 /usr/bin/netkit-ftp다.
-rwxr-xr-x 1 root root 70800 Jun 8 2010 /usr/bin/netkit-ftp
/usr/share/man, /usr/share/doc 디렉토리는 꾸러미 매뉴얼과 관련 정보 파일을 담고있다.
이런 디렉토리의 파일들을 지워도 된다.
쓸모없거나 사용하지 않는 패키지를 지우려면
$ sudo apt-get remove package-name
필자는 ftp대신 lftp를 사용하므로 ftp를 지워보자.
$ sudo apt-get remove ftp
아래는 실행 결과이다.
다른 파일들의 실행에 영향을 주는 패키지를 지울때는 엮인 (의존성을 가진) 패키지들의
이름을 보여준다. python 언어를 지울려고 하면 필자의 노트북에는 버전 2.5와 2.6이 설치되어있다.
python2.5는 지워도 되지만, python2.6는 지우면 시스템 자체를 망가뜨린다.
아래는 $ sudo apt-get remove python2.6 실행 결과의 마지막 부분이다.
데비안 꾸러미 시스템은 다른 꾸러미와 엮인 것일 경우 자세하게 정보를 제공해준다.
위 예에서 보듯이 python2.6는 131개 꾸러미들과 엮여있다.
꾸러미에 엮인 꾸러미들의 자동삭제 (auto removal)을 중단시키려면 아래의 명령어를 친다.
(원문은 여기)
$ sudo aptitude unmarkauto
APT는 꾸러미를 설치할 때마다 auto removal 해야할 꾸러미들을 보여준다.
필자는 auto removal이 뭔지 몰랐을때 수백 개의 꾸러미들을 삭제한적이 있다.
Xorg용 synaptic은 그래픽 꾸러미 관리 프로그램으로 최초 실행할 때 수퍼유저 (root)의
비밀번호를 묻는다. 그리고, 꾸러미 설치, 정보 조회, 삭제등 위에 설명한 내용들을 직관적으로
사용자가 실행할 수 있도록 해준다.
synaptic에서 python2.6을 삭제 선택하면 붉은 빨간줄로 묶인 꾸러미들을 보여준다.
글을 마치기 전에 데비안 배포판은 어떻게 구성이 되는가?
스퀴지 (Squeeze)란 안정 (stable) 버젼 6.0이 출시되기까지 버젼 5.0인 Lenny에서
실험 (experimental), 불안(unstable), 시험(testing)의 3단계를 거쳤다.
APT Pinning을 쓰면 한 시스템에 여러 단계의 꾸러미들을 사용할 수가 있다. 이 기능은 필자도
아직 해보지 못했기 때문에 앞으로 사용해보고 완전히 이해를 하면 올릴 생각이다.
Devuan 1.0 (Debian without systemd)
amd64 station: AMD FX(tm)-6100 Six-Core Processor, 8 GB memory, 1 TB HDD
amd64 laptop: HP Touchsmart
글쇠판: 세벌 최종식, 콜맥 (Colemak)
데비안을 사용하고 있는 사용자로써 좋은 글 잘
데비안을 사용하고 있는 사용자로써 좋은 글 잘 봤습니다...
-----------------------------------------------------
남이 가르쳐주는 것만 받아들이는 것이 아니라, 스스로 만들고, 고쳐가는 사람을 '해커'라고 부른다.
그리고 자신이 쌓아온 노하우를 거리낌없이 나눌 줄 아는 사람을 '진정한' 해커라고 한다.
-Rob Flickenger 'Linux server hacks'
DEBIAN TESTING, KDE...
debpolaris.blogspot.kr
감사합니다.
감사합니다.
Devuan 1.0 (Debian without systemd)
amd64 station: AMD FX(tm)-6100 Six-Core Processor, 8 GB memory, 1 TB HDD
amd64 laptop: HP Touchsmart
글쇠판: 세벌 최종식, 콜맥 (Colemak)
gparted - USB 드라이브 윈도우즈용 파일로 포맷하기.
스퀴즈는 10개 이상의 파일 포맷을 지원한다. 스퀴지의 기본 파일 시스템은 ext3다.
스퀴즈의 기본 윈도우 환경인 그놈2를 사용하면 USB 드라이브를 꼽으면 MS 윈도우즈처럼 자동으로 인식하고 바탕 화면에 USB 드라이브 아이콘이
생긴다. CD나 DVD도 자동으로 인식한다.
다른 윈도우즈 사용자와 자료를 교환하기 위해 USB 드라이브를 사용하려면 윈도우즈에서 인식하는 파일 시스템으로 (NTFS, FAT32, FAT16)으로
USB 드라이브를 포맷하고 데이타 파일을 저장하면 된다.
gparted란 패키지는 Xorg용 프로그램으로 시스템이 인식하는 기록장치들을 파티션 생성, 수정, 포맷한다.
사용방법은 그놈2 메뉴에서 gparted를 선택하거나 터미날에서 gparted를 수퍼유저에서 실행한다.
설치는
$ sudo apt-get install gparted
터미날에서 '$ sudo gparted' 실행하면 gparted 윈도우가 뜬다. usb 드라이버를 꼽아서 포맷해보면 사용법은 쉽게 배울 수 있다.
Devuan 1.0 (Debian without systemd)
amd64 station: AMD FX(tm)-6100 Six-Core Processor, 8 GB memory, 1 TB HDD
amd64 laptop: HP Touchsmart
글쇠판: 세벌 최종식, 콜맥 (Colemak)
VirtualBox 4.1 손 (guest) 기계 설치 및 네트워크 설정 [Update]
자세한 설치방법은 링크 사이트 가서 보기 바란다.
http://www.virtualbox.org/wiki/Linux_Downloads
참고로 VirtualBox가 에러 없이 설치가 되어 실행되는 상태의 프로세스들과 커널 모듈들을
올린다. 필자의 기계에서 보이는 내용임.
VirtualBox 관리기에서 vboxnet0는 네트워크 메뉴에서 추가/삭제할 수 있다.
한글 메뉴를 보려면 File - Preferences 선택
Language에서 한국어를 선택하면 된다.
VirtualBox는 다른 운영체제를 리눅스 내에서 안전하게 사용할 수 있도록 해준다.
VirtualBox가 제공하는 환경 내에서 파일 단위로 운영체제가 존재를 한다. 이 운영체제를
손님이 (Guest)라 부른다.
이 환경이 뛰어난 점은 특수 목적이나 연구또는 실험용으로 운영체제를 실행해야 할 경우
물리적으로 시스템을 구성해 운영체제를 설치하는데 드는 자원과 비용을 없애준다.
리눅스처럼 설치 횟수의 제약이 없는 운영체제는 이론적으로는 사용자가 원하는 만큼 손님
운영체제로 만들어 병렬로 운영할 수 있다.
VirtualBox 안에서 실행하는 손 (guest) 운영체제와 시스템 간 네트워크 연결만 되면 실시간으로 자료를 송수신, 여러가지 네트워크 관련 기능들을 시험할 수 있다.
주인 운영체제의 네트워크 장치가 동작하면, 예를 들어 eth0, 이 장치를 사용해 인터넷은 사용할 수 있다. 그러나 기본적으로 손 운영체제가 주인 (host) 운영체제와 네트워크로 통신을 하지못한다.
이 문제를 해결하는 간단한 방법은 손 기계의 Network에서 Adpater 하나를 추가하고 "Bridged adapter"로 지정하고, 주인 기계의 네트워크를 장치를 지정해준다. 아래는 필자의 손님 Network 설정 상태.
Adapter 1: Intel PRO/1000 MT Desktop (NAT)
Adapter 2: Intel PRO/1000 MT Desktop (Bridged adapter, eth1)
그다음 손 기계의 네트워크 카드 설정 파일 /etc/network/interfaces에 Bridge 카드 정보를 넣는다.
아래는 /etc/network/interfaces 파일 내용.
필자의 피씨에 설치된 스퀴지 시스템을 예를 들겠다.
기계 (host)이름은 theblue로 VirtualBox의 주인(host) 운영체제이다.
Mini64는 VirtualBox안에서 실행되는 손 (guest) 운영체제로 데비안 스퀴지다.
theblue                      라우터
   eth0(비활성)               동적 IP <---> 인터넷
   eth1(192.168.1.100) <---> DHCP 서버

Mini64
   eth0(10.0.2.15)
   eth1(192.168.1.104) <---> theblue:eth1 <---> DHCP 서버 <---> 인터넷

theblue(192.168.1.100) <--+--> Mini64(192.168.1.104)
                          |
laptop(192.168.1.101)  <--+
VirtuabBox 주인 기계 theblue의 네트워크
eth1      Link encap:Ethernet  HWaddr 00:0e:e8:de:d2:e9
          inet addr:192.168.1.100  Bcast:192.168.1.255  Mask:255.255.255.0
          inet6 addr: fe80::20e:e8ff:fede:d2e9/64 Scope:Link
          UP BROADCAST RUNNING MULTICAST  MTU:1500  Metric:1
          RX packets:1195642 errors:0 dropped:0 overruns:0 frame:0
          TX packets:663873 errors:0 dropped:0 overruns:0 carrier:0
          collisions:0 txqueuelen:1000
          RX bytes:1485942977 (1.3 GiB)  TX bytes:66165653 (63.1 MiB)
          Interrupt:20 Base address:0xc00
손 기계 Mini64의 네트워크
eth0      Link encap:Ethernet  HWaddr 08:00:27:76:c3:56
          inet addr:10.0.2.15  Bcast:10.0.2.255  Mask:255.255.255.0
          inet6 addr: fe80::a00:27ff:fe76:c356/64 Scope:Link
          UP BROADCAST RUNNING MULTICAST  MTU:1500  Metric:1
          RX packets:2 errors:0 dropped:0 overruns:0 frame:0
          TX packets:8 errors:0 dropped:0 overruns:0 carrier:0
          collisions:0 txqueuelen:1000
          RX bytes:1180 (1.1 KiB)  TX bytes:1152 (1.1 KiB)

eth1      Link encap:Ethernet  HWaddr 08:00:27:a8:cf:f6
          inet addr:192.168.1.104  Bcast:192.168.1.255  Mask:255.255.255.0
          inet6 addr: fe80::a00:27ff:fea8:cff6/64 Scope:Link
          UP BROADCAST RUNNING MULTICAST  MTU:1500  Metric:1
          RX packets:13 errors:0 dropped:0 overruns:0 frame:0
          TX packets:13 errors:0 dropped:0 overruns:0 carrier:0
          collisions:0 txqueuelen:1000
          RX bytes:1496 (1.4 KiB)  TX bytes:1586 (1.5 KiB)

lo        Link encap:Local Loopback
          inet addr:127.0.0.1  Mask:255.0.0.0
          inet6 addr: ::1/128 Scope:Host
          UP LOOPBACK RUNNING  MTU:16436  Metric:1
          RX packets:0 errors:0 dropped:0 overruns:0 frame:0
          TX packets:0 errors:0 dropped:0 overruns:0 carrier:0
          collisions:0 txqueuelen:0
          RX bytes:0 (0.0 B)  TX bytes:0 (0.0 B)
아래는 Mini64의 가상 기계의 하드 디스크 정보
손 지원품에는 커널 모듈, Xorg용 드라이버들이 소스형태로 들어있다.
손 지원품을 설치하는 순서
루트로 로긴한다.
# apt-get update
손 지원품을 빌드하기 위한 패키지를 설치한다.
# apt-get install build-essential module-assistant
커널 모듈 구성
# m-a prepare
VirtuaBox의 Devices 메뉴에서 VBoxGuestAdditions.iso를 등록시킨다.
iso 파일은 CD/DVD로 인식이 된다. CD/DVD 드라이브를 마운트한다.
# run mount /media/cdrom.
손 지원품 설치를 실행한다.
# sh /media/cdrom/VBoxLinuxAdditions.run
----
2011/8/13 - 손 지원품, 네트워크 설정 내용 추가
2011/8/18 - 손 기계 /etc/network/interfaces 파일 추가
Devuan 1.0 (Debian without systemd)
amd64 station: AMD FX(tm)-6100 Six-Core Processor, 8 GB memory, 1 TB HDD
amd64 laptop: HP Touchsmart
글쇠판: 세벌 최종식, 콜맥 (Colemak)
파일(ftp) 서버와 OpenSSH 서버 설치
ssh 호스트(host)에 접속하며 비밀번호 붙이기
(11/27/2011;)
mini 호스트에 penguin으로 접속할 때 아래의 부림말을 쓰면 password: 물음에
비밀말을 쳐야한다.
$ ssh penguin@mini
expect를 이용하면 비밀번호를 접속시 붙일 수 있다.
expect 깔기는
$ sudo aptitude install -y expect
ssh 접속 스크립트를 만든다.
$ more call-mini
이 스크립트를 부리면 ssh로 mini 호스트에 penguin으로 접속한다.
비밀말은 send 다음에 " "에 넣어준다.
네트워크에 연결된 한 컴퓨터가 파일 (ftp) 서버와 OpenSSH 서버를 제공하면
동일한 네트워크의 다른 컴퓨터에서 서버를 완벽히 통제할 수 있다. 서버에 존재하는
모든 파일을 통째로 백업 받거나, 수퍼유저 작업도 할 수 있다.
스퀴지 설치시 기본 데스크탑 / 노트북을 선택하면 파일 및 OpenSSH 서버는 사용자가
따로 설치해야 한다. 설치 방법은 정말 간단한다.
필자는 파일 서버를 proftpd를 사용한다.
설치 방법은
$ sudo apt-get install proftpd-basic
설치가 끝나면 proftpd 데몬이 실행된다. 데몬의 실행 모드는 internet으로 선택한다.
그러면 inetd 또는 xinetd 데몬이 동작하다가 파일서버 요청이 오면 proftpd 실행시킨다.
파일 서버 동작을 확인은 다른 컴퓨터에서 서버의 존재하는 일반 사용자 계정으로 접속을 한다.
아래 예는 laptop이란 컴퓨터에 penguin이란 사용자로 접속
OpenSSH는 telnet과 같이 서버에 외부에서 접속할 때 데이타를 암호화해서 보안을
유지한다.
OpenSSH 서버를 설치하려면
$ sudo apt-get install ssh
필자의 경우 설치가 끝나고 inetd/xinetd 관련 파일이 없다고 에러가 났다.
$ sudo apt-get install inetd
inetd를 설치하고 ssh를 다시 설치한다.
그럼 OpenSSH 서버가 정상적으로 설치될 것이다.
OpenSSH 서버 동작을 확인하려면 다른 컴퓨터에서 ssh로 서버에 접속을 한다.
노트북에서 서버의 penguin이란 사용자로 접속
$ ssh penguin@192.168.1.100
Devuan 1.0 (Debian without systemd)
amd64 station: AMD FX(tm)-6100 Six-Core Processor, 8 GB memory, 1 TB HDD
amd64 laptop: HP Touchsmart
글쇠판: 세벌 최종식, 콜맥 (Colemak)
많은 참고가 되겠네요
그러지 않아도 요즘 ubuntu가 맘에 안들어서
데비안을 설치하려고 맘먹고 있는데
덕분에 편하게 설치할수 있겠네요
당장 오늘 퇴근후에 설치해야겠어요 ^^
Exim4 메일 서버로 내부(local) 메일과 외부 발송 이메일 처리
시스템: 데비안 스퀴즈 6.0
2011/08/11
Exim4 메일 서버는 기본으로 설치가 되어 내부 메일 메시지들을 처리한다.
시스템 데몬들이 생성한 파일들이나 메시지들이 Exim 서버를 통해 내부 사용자들에게 전달된다.
root와 설치시 만든 일반 사용자는 터미날이나 Xorg에서 메일 프로그램으로 내부 메시지를 볼 수 있다.
터미날용 메일 프로그램으로 Mutt도 자동으로 설치가 된다.
터미날에서 'mutt'을 실행하면 현재 로긴한 계정의 내부 메일을 볼 수 있다.
Exim4 메일 서버에 자신이 사용하는 웹 메일 서버의 발신 (SMTP) 서버를 연결하면
터미날에서 간단히 명령어 한 줄로 데이타 파일들을 보낼 수 있다.
필자는 데이타 백업으로 외부 메일 서버를 사용한다. Xorg용 이메일 프로그램을 이용하여 외부 메일을
송수신해도 되지만, 터미날에서 명령행 한줄로 자료 파일을 외부 메일서버에 저장한다는 효율적이다.
한가지 꼭 알아야할 점이 있다. Gmail의 경우 3번 또는 4번 연속 실패하면 계정을 중단 시킨다.
Gmail이나 다른 이메일을 사용한다면 자신의 개인 이메일을 테스트 목적으로 이용하지 말자.
Gmail은 5분이면 새 이메일 계정을 만든다.
만약 Gmail 계정이 필자의 경우처럼 중단이 되면 이 계정으로 연동된 다른 서비스들도 자동으로 중단된다.
필자가 몇년 동안 사용해온 Gmail 계정을 이용했다가 시험과정 중에서 계정이 중단 되었다.
그 직후 몇년 동안 운영해온 블로그도 중단되었다. 복구하는 과정은 계정의 비밀번호를 새로 요청하기 위해서
국가 (한국)와 전화번호를 입력해야한다.
그러면 몇분 사이에 구글에서 음성 메시지가 전달이 된다. 음성 메시지는 영어로 5자리 숫자를 짧게 2번 반복하고
끊긴다. 이 5자리 숫자 코드를 구글에 접속해서 입력을 하면 새 비밀번호로 변경하는 메뉴로 진행이 된다.
설치 과정은 http://wiki.debian.org/GmailAndExim4를 참고로 했다.
수퍼유저 권한에서
# dpkg-reconfigure exim4-config
메일 서버 구성 (Mail Server configuration)
제목의 윈도우 마지막 문장이 아래와 같다. 요약하면 동적 IP 주소를 사용하는 시스템은
자체 메일을 받거나 내부 배달 기능을 끌 수 있다.
"A system with a dynamic IP address can receives its own mail, or local
delivery can be disabled entirely (except mail for root and postmaster)."
를 누른다.
"General type of mail configuration:"에서
mail sent by SMARTHOST; received via SMTP or fetchmail를 선택한다.
화살표 키로 선택 막대기를 이 줄에 놓고 엔터키를 친다.
System mail name:
설치시 입력한 내부 호스트명이 입력 칸에 보일 것이다. 입력 예는 company.com
IP Adresses to listen on for incoming SMTP connections:
127.0.0.1을 입력한다.
Other destinations for which mail is accepted
는 공백으로 나둔다.
Machines to relay mail for:
공백으로 나둔다.
Machine handling outgoing mail for this host (smarthost):
Gmail은 smtp.gmail.com::587을 입력한다.
don't hide local mail name in outgoing mail.
NO를 선택한다.
don't keep number of DNS-queries minimal (Dial-on-Demand).
NO를 선택한다.
프로그램이 종료할 것이다.
그다음 /etc/exim4/passwd.client 파일을 수정해야 한다.
# vim /etc/exim4/passwd.client
또는
$ sudo vim /etc/exim4/passwd.client
아래와 같은 내용이 뜰 것이다.
자신이 사용하는 외부 메일 서버 이메일 주소와 비밀번호를 입력한다.
필자는 메일 전송 목적으로 따로 만든 이메일 정보를 입력했다.
위에 사용한 형태의 암호 생성은 mkpasswd로 만든 문자열을 사용하면 된다.
아래는 mkpasswd 실행 예
입력을 끝내고 저장한 후 종료를 한다. 그다음
수퍼유저 쉘에서
# chown root:Debian-exim /etc/exim4/passwd.client
# update-exim4.conf
마지막으로 외부 메일 발송을 시험한다. 한줄 짜리 메일 발송 명령어
$ echo | mutt -s "mail test" -- xxxx@daum.net
제목이 "mail test"인 본문이 공백인 이메일을 xxx@daum.net에 전송하는 것이다.
필자가 원래 목적으로 구상한 데이타 파일 전송은 -a인 첨부 옵션으로 파일을 지정해주면 된다.
$ echo | mutt -s "메일 제목" -a file -- xxx@daum.net
penguin@theblue.net
필자가 설치시 지정한 스퀴즈 시스템의 도메인 명이 theblue.net이다.
penguin은 이 시스템의 일반 사용자 이름이다.
메일 전송 과정은
mutt --> Exim4 --> smtp.gmail.com --> mail.daum.net
아래는 필자의 다움 이메일에 도착한 이메일 헤더 부분이다. 헤더의 중간 부분은 삭제했다.
Devuan 1.0 (Debian without systemd)
amd64 station: AMD FX(tm)-6100 Six-Core Processor, 8 GB memory, 1 TB HDD
amd64 laptop: HP Touchsmart
글쇠판: 세벌 최종식, 콜맥 (Colemak)
ssh를 이용한 X 서버 원격 설정시 Gnome2에서 수정해야 하는 파일.
ssh서버에 접속해도 xeyes나 xterm같은 X 프로그램들을 실행시키면
"Can't display"란 에러만 뜬다.
데비안 스퀴지는 Gnome2에서 TCP/IP 통신 기능을 보안을 이유로 꺼놓았다.
/etc/gdm3/daemon.conf 파일에서 [security] 부분에 "DisallowTCP=false"를 넣어주고
재부팅해야 Gnome2가 TCP/IP로 X 서버에 접속시 클라이언트가 서버와 통신을 한다.
Devuan 1.0 (Debian without systemd)
amd64 station: AMD FX(tm)-6100 Six-Core Processor, 8 GB memory, 1 TB HDD
amd64 laptop: HP Touchsmart
글쇠판: 세벌 최종식, 콜맥 (Colemak)
(WIP) 목차
Xorg 환경과 한글/영어 입력기(ibus) 설정
패키지 관리하기
sudo 에서 비밀번호 입력 끄기
구글 크롬 설치
시스템 정보 출력 프로그램: hardinfo, gkrellm
파일 송수신 프로그램 lft 설치하기
메일 서버 Exim4 환경 설정
파일(ftp) 서버와 ssh 서버 설치
VirtualBox 4.1에서 네트워크 카드 설정
Devuan 1.0 (Debian without systemd)
amd64 station: AMD FX(tm)-6100 Six-Core Processor, 8 GB memory, 1 TB HDD
amd64 laptop: HP Touchsmart
글쇠판: 세벌 최종식, 콜맥 (Colemak)
한글/영어 입력기 등록 및 Xorg 환경 설정
설치가 끝나고 부팅하면 그놈 윈도우 매니져가 뜬다. (gdm3)
텍스트로 부팅을 하려면 루트에서
# update-rc.d -f gdm3 remove
다시 부팅하면 텍스트 터미날이 기본 로긴 환경이 된다.
데비안 설치시 사용 언어를 한국어로 선택하면 설치 과정에서 한국어처리에 관한 입력기 (ibus)와 관련 글꼴들이 자동으로 설치된다. 그리고 다른 언어를 사용하기 위해서는 루트에서 (필자의 경우에는 영어)
# dpkg-reconfigure locales
ibus 입력장치를 다른 윈도우 매니져 (예, fluxbox)에서 사용하려면 홈 (~) 디렉토리에 .xinitrc를 만든 후 아래 3 줄을 추가한다.
export XMODIFIERS="@im=ibus"
export GTK_IM_MODULE=ibus
/usr/bin/ibus-daemon --xim&
그놈이 아닌 다른 윈도우 매니져를 사용할 때 대기 모드는 어떻게 하는가?
그놈에서 대기 (suspend), 동면 (hibernate)등을 실행해서 동작을 하면 pm-utils 명령어를 사용하면 된다. 대기 모드로 전환하려면 아래의 명령어를 친다.
$ sudo pm-suspend
계속 (resume)은 컴퓨터의 키보드나 마우스를 움직이면 대기 이전 상태로 되돌아간다.
그놈 스퀴지는 그놈이 200MB 이하의 시스템 메모리를 차지한다. (필자의 노트북의 경우 스퀴지 6.0 인텔 32비트 커널을 사용중.) Fluxbox와 같이 적은 메모리에 사용자 임의로 기능들을 수정하는 윈도우 매니져를 사용하면 시스템 메모리 사용이 줄어들어 저사양 컴퓨터에 좋다.
참고로 우분투 Natty (11)은 필자의 노트북에 설치는 되지만 저사양이라고 부팅 자체를 못했다. 우분투 10.0을 몇달 노트북에 사용해보면서 발견한 점은 지나친 시스템 리소스 사용이었다. 업데이트 주기가 데비안 보다 훨씬 짧고, 한번 업데이트시 새로 추가되거나 변경되는 패키지의 용량이 계속 늘어났다. (왜?)
그래픽 카드나 사운드 카드가 인식을 못할 때는 펌웨어를 설치하기를 권한다. 많이 알려진 하드웨어 펌웨어들은 firmware-linux-nonfree과 firmware-linux-free에 담겨있다. 설치는
$ sudo apt-get install firmware-linux-free firmware-linux-nonfree
이 두 패키지를 설치해도 특정 하드웨어를 인식하지 못하면, 데비안 패키지 사이트에 가서 아래와 같이 'firmware'나 하드웨어 이름으로 검색을 한다.
http://packages.debian.org/search?searchon=names&keywords=firmware
펌웨어가 동작하는 예는 필자의 온보드 그래픽 카드를 들겠다. 그래픽 카드는 ATI의 Radeon 2100으로 아래 정보는 lspci로 찾은 것이다.
01:05.0 VGA compatible controller: ATI Technologies Inc Radeon 2100
Radeon 커널 모듈이 카드를 인식 못하는 상태이다. Xorg에서 그래픽 카드의 DRI 및 기나 하드웨어 기능을 사용하지 못한다.
firmware-linux-nonfree 패키지에서 이 카드의 펌웨어를 제공을 한다. 패키지 설치 후 커널 모듈 상태.
커널에서 인식한 펌웨어 파일 정보
[ 4.912679] platform radeon_cp.0: firmware: requesting radeon/RS690_cp.bin
Radeon 커널 모듈을 사용하는 Xorg의 radeon 드라이버가 동작하고 있다. 아래는 hardinfo에 보이는 내용.
Xorg가 사용하는 xorg.conf 파일을 생성하기
Xorg는 설정 파일을 스퀴지는 제공하지 않는다. 내 시스템에 맞는 xorg.conf 파일을 만들려면 우선 Xorg를 종료하고 터미널 모드로 간다. 루트 상태에서 아래 명령어를 실행한다. 자세한 내용은 http://wiki.debian.org/Xorg
Xorg에서 터미날로 전환하려면 Ctrl+Atl+[F1에서 F7]을 누른다. 로긴 상태가 X 윈도우라면 아래 중 하나의 명령을 선택해 Xorg를 멈춘다.
/etc/init.d/kdm stop
/etc/init.d/gdm stop
/etc/init.d/xdm stop
# cd /etc/X11/
# Xorg -configure
생성된 xorg.conf.new 파일을 /var/log/Xorg.0.log 내용을 참조해 수정하고 xorg.conf로 저장한다. 수정전 mv xorg.conf.new xorg.conf 또는 수정 후 파일 이름을 바꾼다.
아래는 필자의 xorg.conf 내용으로 Monitor와 Device 부분만 수정했다.
# X.Org X Server 1.7.7
# Test version 1

Section "Files"
        ModulePath   "/usr/lib/xorg/modules"
        FontPath     "/usr/share/fonts/X11/misc"
        FontPath     "/usr/share/fonts/X11/cyrillic"
        FontPath     "/usr/share/fonts/X11/100dpi/:unscaled"
        FontPath     "/usr/share/fonts/X11/75dpi/:unscaled"
        FontPath     "/usr/share/fonts/X11/Type1"
        FontPath     "/usr/share/fonts/X11/100dpi"
        FontPath     "/usr/share/fonts/X11/75dpi"
        FontPath     "/var/lib/defoma/x-ttcidfont-conf.d/dirs/TrueType"
        FontPath     "built-ins"
EndSection


Section "Module"
        Load  "record"
        Load  "dri2"
        Load  "dbe"
        Load  "extmod"
        Load  "dri"
        Load  "glx"
        Load  "radeon"
        Load  "exa"
EndSection

Section "InputDevice"
        Identifier  "Keyboard0"
        Driver      "kbd"
EndSection

Section "InputDevice"
        Identifier  "Mouse0"
        Driver      "mouse"
        Option      "Protocol" "auto"
        Option      "Device" "/dev/input/mice"
        Option      "ZAxisMapping" "4 5 6 7"
EndSection


Section "Monitor"
        #DisplaySize      410   260     # mm
        Identifier   "Monitor0"
        VendorName   "SAM"
        ModelName    "SyncMaster 941BW"
        HorizSync    30.0 - 81.0
        VertRefresh  56.0 - 75.0
        Modeline "1440x900"  106.50  1440 1520 1672 1904  900 903 909 934
# Modeline "1440x900"x75.0  136.75  1440 1536 1688 1936  900 903 909 942 -hsync +vsync (70.6 kHz)
# Modeline "1280x960"x60.0  108.00  1280 1376 1488 1800  960 961 964 1000 +hsync +vsync (60.0 kHz)
        Option      "DPMS"
EndSection


Section "Device"
        ### Available Driver options are:-
        ### Values: <i>: integer, <f>: float, <bool>: "True"/"False",
        ### <string>: "String", <freq>: "<f> Hz/kHz/MHz"
        ### [arg]: arg optional
        #Option     "NoAccel"                   # [<bool>]
        # <snip>

  Identifier  "Card0"
        Driver      "radeon"
        VendorName  "ATI Technologies Inc"
        BoardName   "Radeon 2100"
        Option     "AGPMode"                    "4"
        Option     "DRI"                        "True"
        Option     "ClockGating"                "True"
        Option     "EnablePageFlip"             "True"
        Option     "AccelMethod"                "EXA"
        Option     "EXAVSync"                   "True"
        Option     "DynamicPM"                  "True"
        Option     "ScalerWidth"                "2048"
        Option     "RenderAccel"                "True"
        Option     "AccelDFS"                   "True"
        BusID       "PCI:1:5:0"
# (WW) RADEON(0): Option "AGPMode" is not used
# (WW) RADEON(0): Option "ClockGating" is not used
# (WW) RADEON(0): Option "DynamicPM" is not used
# (WW) RADEON(0): Option "ScalerWidth" is not used

EndSection

Section "Screen"
        Identifier "Screen0"
        Device     "Card0"
        Monitor    "Monitor0"
        DefaultDepth  16
        SubSection "Display"
                Viewport   0 0
                Depth     24
                Modes "1400x900"
        EndSubSection
EndSection


Section "ServerLayout"
        Identifier     "X.org Configured"
        Screen      0  "Screen0" 0 0
        InputDevice    "Mouse0" "CorePointer"
        InputDevice    "Keyboard0" "CoreKeyboard"
EndSection
Xorg 기능을 수정, 첨가할 수 있는 xorg.conf를 만들고 Xorg에서 모든 하드웨어가 잘 동작하면 홈디렉토리에 ~ (/home/)에 .xinitrc 파일을 만들어 기본 Xorg 환경을 꾸민다.
아래는 필자의 .xinitrc 내용이다. 윈도우 매니져는 fluxbox를 사용한다.
ibus 한글/영어 입력기 설정하고 ibus-daemon을 부른다.
xcalib로 모니터 보정
화면 번쩍임을 끔
quicksynergy
(quicksynery는 소프트웨어적으로 키보드와 마우스를 네트워크에 연결된 다수의 컴퓨터를 사용하도록 해준다. 간단한 복사-붙이기 기능도 제공해준다.)
fluxbox의 바탕화면 설정
gkrellm (위에서 얘기한 시스템 상태 표시 프로그램)
그놈 터미날 (xterm보다 기능이 많은 터미날로 그놈의 기본 프로그램중 하나)
fluxbox 실행
ibus의 한/영 전환은 일반 윈도우 키보드에서는 스페이스 바로 옆의 오른쪽 Alt 키다.
Devuan 1.0 (Debian without systemd)
amd64 station: AMD FX(tm)-6100 Six-Core Processor, 8 GB memory, 1 TB HDD
amd64 laptop: HP Touchsmart
글쇠판: 세벌 최종식, 콜맥 (Colemak)
sudo 에서 비밀번호 입력 끄기
sudo는 일반 사용자에게 수퍼유저(root)만 실행할 수 있는 프로그램들을 사용할 권한을 주는 프로그램이다.
왜 sudo를 사용하는가? root로 작업을 하면 실수로 시스템 파일이나 데이타를 삭제할 수가 있다. sudo는 꼭 필요한 시스템 작업을 할때 일반 사용자의 자격으로 사용하기 때문에 이런 실수를 줄여준다. 수퍼유저로 작업할 때 'rm *' 나 'rm -rf *' 명령어를 실행하기 전 내용을 꼭 확인하기 바란다.
패키지 설치 및 시스템을 관리 작업시 sudo를 자주 사용한다.
sudo를 사용하려면 로긴 또는 su로 루트 권한을 얻고 visudo를 친다.
visuo는 nano 편집기로 기본 sudo파일을 불러온다.
아래와 같은 파일 편집 상태에서 linuxer란 사용자를 등록한다. 'NOPASSWD:'를 넣지 않으면 sudo를 실행할 때 매번 똔 5분이 지나면 암호를 입력해야 하기 때문에 번거롭다.
Devuan 1.0 (Debian without systemd)
amd64 station: AMD FX(tm)-6100 Six-Core Processor, 8 GB memory, 1 TB HDD
amd64 laptop: HP Touchsmart
글쇠판: 세벌 최종식, 콜맥 (Colemak)
구글 크롬 설치
필자가 사용하는 웹 브라우져는 구글 크롬 (Google Chrome)이다.
(9/8/2011; java 플러그인 설치)
사이트의 광고 딱지들 (banner) 막기
(11/27/2011;)
AdBlock이란 Extension을 설치하면 거의 모든 광고 딱지들을 막아준다.
크롬 16.0.912.41 beta에서 자바 플러그인 새판깔기(upgrade)
(11/21/2011;)
jre 6.29판 데비안 꾸러미가 아직은 없다.
자바 사이트에서 jre-6u29-linux-x64.bin를 내려받는다.
임시 디렉토리를 만들어 'sh jre-6u29-linux-x64.bin'를 실행한다.
'jre1.6.0_29' 디렉토리가 생겼는지 확인한다.
$ cd /usr/lib/jvm/
java-6-sun-1.6.0.29
    +-- bin
    +-- ext
    +-- jre
    +-- man
         +-- ja
         +-- man1
$ sudo mkdir java-6-sun-1.6.0.29
$ cd java-6-sun-1.6.0.29
$ sudo mkdir bin ext man
$ sudo mv [path]/jre1.6.0_29 jre
java-6-sun-1.6.0.29/bin 디렉토리에
java-6-sun-1.6.0.29/jre/bin 링크 파일들을 만든다.
$ cd java-6-sun-1.6.0.29/bin
$ sudo ln -s ../jre/bin/ControlPanel
lrwxrwxrwx 1 root root 23 Nov 20 16:30 ControlPanel -> ../jre/bin/ControlPanel
lrwxrwxrwx 1 root root 15 Nov 20 16:30 java -> ../jre/bin/java
lrwxrwxrwx 1 root root 18 Nov 20 16:30 java_vm -> ../jre/bin/java_vm
lrwxrwxrwx 1 root root 17 Nov 20 16:30 javaws -> ../jre/bin/javaws
lrwxrwxrwx 1 root root 19 Nov 20 16:31 jcontrol -> ../jre/bin/jcontrol
lrwxrwxrwx 1 root root 18 Nov 20 16:31 keytool -> ../jre/bin/keytool
lrwxrwxrwx 1 root root 15 Nov 20 16:31 orbd -> ../jre/bin/orbd
lrwxrwxrwx 1 root root 18 Nov 20 16:31 pack200 -> ../jre/bin/pack200
lrwxrwxrwx 1 root root 21 Nov 20 16:31 policytool -> ../jre/bin/policytool
lrwxrwxrwx 1 root root 15 Nov 20 16:31 rmid -> ../jre/bin/rmid
lrwxrwxrwx 1 root root 22 Nov 20 16:31 rmiregistry -> ../jre/bin/rmiregistry
lrwxrwxrwx 1 root root 21 Nov 20 16:31 servertool -> ../jre/bin/servertool
java-6-sun-1.6.0.29/man/{ja,man1} 디렉토리를 만들고 위처럼 링크 파일들을
만든다.
$ cd /usr/lib/jvm/
$ sudo rm -f java-6-sun
$ sudo ln -s java-6-1.6.0.29 java-6-sun
크롬을 시작하고 [Preferences]-[Under the hood]-[Content Settings]-[Plug-ins]
메뉴로 가서 자바 플러그인이 다음처럼 보일 것이다.
/usr/lib/jvm/java-6-sun-1.6.0.29/jre/lib/amd64/libnpjp2.so
줄임글쇠
(11/15/2011;)
Alt + 왼 화살: 이전 쪽
Alt + 오른 화살: 앞 쪽
Ctrl + F: 찾기
Ctrl + H: 옛날 누리집들
Ctrl + J: 내려받음들
http://www.google.com/support/chrome/bin/static.py?page=guide.cs&guide=25799&topic=28652
구글 크롬 사이트에 가서 안정판 deb 파일을 받거나 /etc/apt/source.list 파일에 아래 내용을 입력하면
데비안의 apt 패키지 명령어를 사용해 설치할 수 있다.
# Google software repository
deb http://dl.google.com/linux/deb/ stable non-free main
참고로 필자의 /etc/apt/source.list 파일 내용을 그대로 올린다.
위 파일에서 아래 내용은 필자가 추가한 것이다.
# Google software repository
deb http://dl.google.com/linux/deb/ stable non-free main
# Experimental
# /etc/apt/sources.list.d/kirya_experimental.sources.list.
설치한 구글 크롬의 버젼은 13.0.782.107 이다. 필자가 사용중 발견한 치명적 에러는 플래시 관련 음악 또는
동영상을 실행시키지 못함이었다. 해결방법은 아도브에서 배포하는 플래시로 대치. 아래는 데비안의 기본 플래시
파일을 아도브 플래시로 대치하는 방법이다.
자바 플러그인 설치하기
$ sudo aptitude install sun-java6-jre sun-java6-plugin sun-java6-fonts
The following NEW packages will be installed:
  gsfonts-x11{a} odbcinst{a} odbcinst1debian2{a} sun-java6-bin{a} sun-java6-fonts
  sun-java6-jre sun-java6-plugin unixodbc{a}
0 packages upgraded, 8 newly installed, 0 to remove and 16 not upgraded.
Need to get 35.6 MB of archives. After unpacking 102 MB will be used.
Do you want to continue? [Y/n/?]
캐쉬 플래시 (flv) 파일 읽기
(10/10/2011;)
아래 방법을 사용하면 크롬에서 본 플래시 자료를 저장할 수 있다.
$ ps ax | grep -i chrome | grep -i flash
$ file /proc/Flash_Plugin_PID/fd/* | grep -i deleted
/tmp/Flashxdx00.flv (deleted) 와 같은 임시 파일 링크가 나온다.
이 파일을 가리키는 프로세스 번호로 시작하는 파일을 복사한다.
Devuan 1.0 (Debian without systemd)
amd64 station: AMD FX(tm)-6100 Six-Core Processor, 8 GB memory, 1 TB HDD
amd64 laptop: HP Touchsmart
글쇠판: 세벌 최종식, 콜맥 (Colemak)
시스템 정보 출력 프로그램: hardinfo, gkrellm
시스템 정보를 보여주는 유용한 프로그램이 있다.
설치 방법은 Xorg 환경에서 synaptic을 이용하거나 터미날에서
$ sudo apt-get install hardinfo
gkrellm은 현재 시스템 상태를 보여주는 프로그램이다.
현재 시간, CPU 부하, CPU온도, 네트워크 상태, 메모리, 기타.
설치하려면 터미날에서
$ sudo apt-get install gkrellm
Devuan 1.0 (Debian without systemd)
amd64 station: AMD FX(tm)-6100 Six-Core Processor, 8 GB memory, 1 TB HDD
amd64 laptop: HP Touchsmart
글쇠판: 세벌 최종식, 콜맥 (Colemak)
현재 사용하는 컴퓨터 사양
피씨 사양:
CPU: AMD Athlon 64bit Dual 코어
메모리: 3.0 GiB
하드 디스크: 160 GiB
사운드 카드: Intel HDA (보드 내장)
그래픽 카드: ATI Radeon 2100 (보드 내장)
CD/DVD 드라이브
주변장치: 네트워크 카드 (보드내장) 1개, PCI 카드 1개
타블렛: Wacom Bamboo Fun
모니터: 삼성 19인치 SyncMaster
노트북 사양:
모델: Compaq nc6220 14인치 모니터
CPU: Intel 팬티엄 M 1.8 Ghz
메모리: 1.0 GiB
하디 디스크: 60 GiB
주변장치: 사운드카드, CD/DVD 드라이브, 네트워크 카드, 무선랜
라우터: Cisco Linksys 무선/유선
프린터: HP Laserjet P1005
Devuan 1.0 (Debian without systemd)
amd64 station: AMD FX(tm)-6100 Six-Core Processor, 8 GB memory, 1 TB HDD
amd64 laptop: HP Touchsmart
글쇠판: 세벌 최종식, 콜맥 (Colemak)
터미날에서는 한글 메시지 처리를 못한다.
시스템 로케일이 한국어일 때 터미날에서는 한글처리를 전혀 못한다.
이 경우에는 터미날에서 export LANG=en_US.utf-8을 한다.
Devuan 1.0 (Debian without systemd)
amd64 station: AMD FX(tm)-6100 Six-Core Processor, 8 GB memory, 1 TB HDD
amd64 laptop: HP Touchsmart
글쇠판: 세벌 최종식, 콜맥 (Colemak)
터미날에서 한글 처리?
Xorg가 아니 터미날로 부팅하면 한글 처리가 안된다.
--
http://www.ubuntu.or.kr/viewtopic.php?p=87642#p87642
jfbterm이 깨끗하게 나오긴 하나,
exit명령시 시스템이 먹통되는 일이 있어서, fbterm으로 바꿨습니다. 글꼴설정을 해주면 나름 깨끗하게 나옵니다.
sudo apt-get install fbterm uim uim-byeoru uim-fep ttf-nanum-coding ttf-dejavu
#~/.fbtermrc
font-size=14
font-names=Dejavu Sans Mono,NanumGothicCoding
color-foreground=7
history-lines=1000
text-encoding=MSCP949,EUC-KR,utf-8,utf-16
cursor-shape=0
cursor-interval=500
word-chars=._-
screen-rotate=0
input-method=
#~/.profile
# 다음내용 추가
# fbterm을 한국어로켈의 uim-fep를 자동실행되게 얼라이어스함.
alias fbterm='LC_ALL=ko_KR.utf8 LANG=ko_KR.utf8 LANGUAGE="ko_KR;ko; en_GB;en" /usr/bin/fbterm /usr/bin/uim-fep'
tty_tmp=`tty | sed -e "s/\/dev\/\([ty]*\)\([0-9]*\).*/\1 \2/"`
ttytype=${tty_tmp%% *}
if [ "$ttytype" == "tty" ]; then
echo "You are in Console."
ttyno=${tty_tmp##* }
# 콘솔의 기본로켈을 영어로 설정
LANG="en_US.UTF-8"
LANGUAGE="en_GB;en;ko_KR;ko"
LC_ALL=$LANG
export LC_ALL LANG LANGUAGE
# 가상터미널 3-6번은 로그인시에 자동으로 fbterm 실행
for available in 3 4 5 6; do [ $ttyno -eq $available ] & done
else
# 콘솔 로그인이 아닌 경우 로켈을 한국어로 설정
echo "Maybe you are in X-Window."
LANG="ko_KR.UTF-8"
LANGUAGE="ko_KR;ko;en_GB;en"
LC_ALL=$LANG
export LC_ALL LANG LANGUAGE
fi
uim-pref-gtk를 실행하여 기본 입력기를 벼루로 설정하시고, 벼루키설정을 하세요.
한영전환은 Ctrl+Space로 전환됩니다.
Devuan 1.0 (Debian without systemd)
amd64 station: AMD FX(tm)-6100 Six-Core Processor, 8 GB memory, 1 TB HDD
amd64 laptop: HP Touchsmart
글쇠판: 세벌 최종식, 콜맥 (Colemak)
그래픽 지원 Vim 설치.
기본으로 제공되는 Vim은 그래픽 기능이 빠져있다. 그래픽 기능을 사용하는 설정 파일을
읽을 때 다음과 같은 에러가 난다. syntax는 단어에 색깔을 주는 옵션으로, 파이썬, C/C++
같은 소스 파일 편집 설정 파일에서 사용을 한다.
Vim에 대한 세부 정보를 알고 싶으면 vim 실행 후 ':version'을 입력한다.
Small version without GUI은 그래픽이 빠진 소형 버전이란 뜻.
그래픽 지원 Vim 설치는
$ sudo aptitude install vim-gui-common vim-runtime
vim-tiny는 삭제를 한다. purge 옵션은 삭제되는 패키지의 설정 파일까지 지운다.
$ sudo aptitude purge vim-tiny
--
2011/08/14
Devuan 1.0 (Debian without systemd)
amd64 station: AMD FX(tm)-6100 Six-Core Processor, 8 GB memory, 1 TB HDD
amd64 laptop: HP Touchsmart
글쇠판: 세벌 최종식, 콜맥 (Colemak)
fluxbox 화면 이미지.
Devuan 1.0 (Debian without systemd)
amd64 station: AMD FX(tm)-6100 Six-Core Processor, 8 GB memory, 1 TB HDD
amd64 laptop: HP Touchsmart
글쇠판: 세벌 최종식, 콜맥 (Colemak)
fluxbox 윈도우 관리기
fluxbox는 Xorg 윈도우 관리기이다.
메모리 사용량이 적고 1.0이후 버젼은 안전성도 높아졌다.
fluxbox는 작고 단단하며 사용자가 단축키 지정, 작업마당 (workspace) 설정 변환의
기본 기능과 꼭지 (tab), 묶음 (group), 슬릿 (slit)의 뛰어난 프로그램 관리 기능도
가지고 있다.
(필자는 탭을 본문에서 '꼭지'로 부르기로 한다.)
꼭지는 불여우나 크롬같은 웹 브라우져에서 사용되는 기능 중 하나다. 웹 사이트마다 꼭지를
열어 독립된 윈도우 숫자들을 줄여 관리가 편하게 해준다.
fluxbox는 프로그램들에 이름표를 붙여 한 프로그램의 윈도우에 여러 개의 서로다른 프로그램을
집어넣어 관리를 한다. 사용방법은 웹 브러우져와 똑같다. 이름표를 선택하면 해당 프로그램의
윈도우가 맨 앞에 나타난다.
예로 아래 화면에서 4개의 프로그램이 실행되고 있다.
두개의 그놈 터미날 (왼쪽 위, 밑), 구글 크롬과 evince (PDF 보기)
구글 크롬과 evince의 전환은 마우스로 꼭지를 선택하면 된다.
(참고로, fluxbo는 5가지가 넘는 정교한 윈도우 전환 (focus) 옵션을 제공한다.)
http://kldp.org/files/fbox-tab1.jpg
글쇠판 줄임들 (keyboard shortcuts)
(11/09/2011;)
~/.flubox/keys 파일에서 글쇠판 줄임들을 정의한다.
Mod1은 Alt, Control은 Ctrl 글쇠이다. Mod4는 윈도우 글쇠다(마이크로소프트 윈도우 로고가 그려진 글쇠).
아래 예에서 Alt와 F1 글쇠를 함께 누리면 gnome-terminal을 실행한다.
Alt와 F2 글쇠 뭉침에 구글 크롬 브라우져를 정의했다.
Ctrl과 Pause(멈춤) 글쇠 뭉침에 관리자로 권한으로 시스템을 끄는 명령어를 정의했다.
Xorg에서 사용하는 글쇠 이름을 모를 때는 xmodmap -pke를 터미날에서 실행하면
모든 글쇠 이름을 보여준다.
마우스 커서가 화면의 끝에 가면 다음 작업마당으로 넘어가는 기능 끄기
(10/30/2011;)
[Configuration]에서 [Workspace Warping]을 킨다.
oneko
쥐를 따라다니는 고양이
설치는 $ sudo aptitude install oneko
unclutter
마우스 커서를 화면에서 지우는 프로그램.
설치는 $ sudo aptitude install unclutter
사용 예:
unclutter -idle 2 -root -jitter 10 &
Devuan 1.0 (Debian without systemd)
amd64 station: AMD FX(tm)-6100 Six-Core Processor, 8 GB memory, 1 TB HDD
amd64 laptop: HP Touchsmart
글쇠판: 세벌 최종식, 콜맥 (Colemak)
Vim 사용하기.
1. 편집 중 쉘 명령어 실행
vim 편집 중 쉘로 나갈려면 :shell 또는 :sh
다음의 스크립트를 편집 중이라고 하자. 입력 모드라면 ESC키를 눌러 읽기 모드로 전환 후 :shell을 친다.
필자가 사용하는 bash로 전환된 상태
Vim 윈도우 안에서 프로그램을 실행하려면 ":! program %"
":! wc -l %"를 실행한 결과로 'wc -l'에 현재 편집중인 파일을 넘겨 전체 줄수
를 계산한다.
버퍼 이동하기.
:buffers 현재 열린 모든 버퍼를 보여준다
:b N N번째 버퍼로 이동한다.
Vim은 한 개의 윈도우에서 여러 파일들을 읽고 편집할 수 있다. 파일을 읽으면 버퍼 (buffer)가 생성된다. 버퍼의 갯수는 보통 파일의 갯수와 같다.
현재 생성된 버퍼들을 보려면 읽기 모드에서 ":buffers"를 입력한다.
아래는 실행 예이다. %a는 현재 사용하는 버퍼를 가리킨다.
while True:
line = sys.stdin.readline()
        if not line:
                break
        print "%s: %s" % (counter, line)
        counter += 1

:buffers
  1 #    "sysinfo.py"                   line 16
  2 %a   "sys.stdin.readline.py"        line 1
다른 버퍼로 이동하려면 ":b [number]"를 입력한다. 위 예에서
":b 1"은 sysinfo.py 파일의 버퍼로 이동한다.
파일 닫기.(08/22/2011)
:[n]bw
위 예에서 sysinfo.py 파일을 닫으려면 읽기 모드에서 ":1bw" 입력한다.
Devuan 1.0 (Debian without systemd)
amd64 station: AMD FX(tm)-6100 Six-Core Processor, 8 GB memory, 1 TB HDD
amd64 laptop: HP Touchsmart
글쇠판: 세벌 최종식, 콜맥 (Colemak)
USB 장치를 위한 xorg.conf 설정
(10/25/2011;)
USB 키보드, 마우스, 기타 주변 장치들을 위한 xorg.conf 설정하기
'/etc/X11/xorg.conf.d/'가 없으면 루트로 로긴해서 디렉토리를 만든다.
/etc/X11/xorg.conf.d/10-evdev.conf 파일을 아래와 같이 만든다.
# wiki.archlinux.org
# Catchall classes for input devices
# We don't simply match on any device since that also adds accelerometers
# and other devices that we don't really want to use. The list below
# matches everything but joysticks.

Section "InputClass"
        Identifier "evdev pointer catchall"
        MatchIsPointer "on"
        MatchDevicePath "/dev/input/event*"
        Driver "evdev"
EndSection

Section "InputClass"
        Identifier "evdev keyboard catchall"
        MatchIsKeyboard "on"
        MatchDevicePath "/dev/input/event*"
        Driver "evdev"

        # Keyboard layouts
        Option "XkbLayout" "us"
        # Option "XkbLayout" "us,ko"
        # Option "XkbVariant" "intl"
        # Option "XkbVariant" ",phonetic"
        # Option "XkbOptions" "terminate:ctrl_alt_bksp"
        # Option "XkbOptions" "grp:alt_shift_toggle, grp_led:scroll, terminate:ctrl_alt_bksp"
EndSection

Section "InputClass"
        Identifier "evdev touchpad catchall"
        MatchIsTouchpad "on"
        MatchDevicePath "/dev/input/event*"
        Driver "evdev"
EndSection

Section "InputClass"
        Identifier "evdev tablet catchall"
        MatchIsTablet "on"
        MatchDevicePath "/dev/input/event*"
        Driver "evdev"
EndSection

Section "InputClass"
        Identifier "evdev touchscreen catchall"
        MatchIsTouchscreen "on"
        MatchDevicePath "/dev/input/event*"
        Driver "evdev"
EndSection
'/etc/X11/xorg.conf'에서 키보드와 마우스 부분을 지운다.
#Section "InputDevice"
#       Identifier  "Keyboard0"
#       Driver      "kbd"
#EndSection

#Section "InputDevice"
#       Identifier  "Mouse0"
#       Driver      "mouse"
#       Option      "Protocol" "auto"
#       Option      "Protocol" "IMPS/2"
#       Option      "Device" "/dev/input/mice"
#       Option      "Buttons"  "3"
#       Option      "ZAxisMapping" "4 5"
#       Option      "CorePointer"
#       Option      "SendCoreEvents" "true"
#EndSection

Section "ServerLayout"
        Identifier     "X.org Configured"
        Screen      0  "Screen0" 0 0
#       InputDevice    "Mouse0" "CorePointer"
#       InputDevice    "Keyboard0" "CoreKeyboard"
EndSection
Xorg가 사용하는 장치를 보려면 xinput 프로그램을 이용한다.
내 셈틀에 PS/2 마우스와 HP USB 키보드 (pc104 모델)가 연결되어 있다.
 xinput list
⎡ Virtual core pointer                    	id=2	[master pointer  (3)]
⎜   ↳ Virtual core XTEST pointer              	id=4	[slave  pointer  (2)]
⎜   ↳ ImPS/2 Generic Wheel Mouse              	id=9	[slave  pointer  (2)]
⎜   ↳ Macintosh mouse button emulation        	id=10	[slave  pointer  (2)]
⎣ Virtual core keyboard                   	id=3	[master keyboard (2)]
    ↳ Virtual core XTEST keyboard             	id=5	[slave  keyboard (3)]
    ↳ Power Button                            	id=6	[slave  keyboard (3)]
    ↳ Power Button                            	id=7	[slave  keyboard (3)]
    ↳ CHICONY HP Basic USB Keyboard           	id=8	[slave  keyboard (3)]
Devuan 1.0 (Debian without systemd)
amd64 station: AMD FX(tm)-6100 Six-Core Processor, 8 GB memory, 1 TB HDD
amd64 laptop: HP Touchsmart
글쇠판: 세벌 최종식, 콜맥 (Colemak)
나는 얼마나 손가락 건강에 신경을 섰던가?
(10/29/2010;)
최근에 갑자기 키보드에 대한 내 관념을 생각하게 되었다.
이제까지 셈틀 사용시 기본 자세에는 신경을 써왔다.
바람처럼 자주 이동하는 생활때문에 가끔 셈틀용 책상을 구하지 못해 버려진 식타나
헌 테이블을 이용한 적이 몇번 있다.
내가 지키는 절대 원칙 하나는 책상 폭은 (모니터와 몸통 사이 거리) 최소한 두 팔꿈치
모두를 편안하게 수평으로 놓을 수만큼 넓어야 한다.키보드 끝에서 책상 모서리까지
35cm에서 40cm는 되야한다. 책상 전체 폭은 60cm 이상!!
이 기준에 맞는 셈틀 전용 제품을 아직까지 본적이 없다. 저가 조립식 제품들은 거의
모두 키보드 수납 공간만 있다. 이런 자세에서 키보드를 오래 사용하면 손목이 먼저
망가진다. 그다음 눈이다.
일부 키보드 매니아들의 비좁은 책상 사진들을 보며 놀랬다.
어째서 저런 환경에 살며 궁극의 손가락 건강을 쫒는다는 거지?
Devuan 1.0 (Debian without systemd)
amd64 station: AMD FX(tm)-6100 Six-Core Processor, 8 GB memory, 1 TB HDD
amd64 laptop: HP Touchsmart
글쇠판: 세벌 최종식, 콜맥 (Colemak)
한글은 세벌식, 영어는 드보락 추천
손가락 건강에 신경 쓰신다면 세벌식과 드보락 쓰시고 계시겠죠?
세벌 https://sebuls.blogspot.kr/
세벌식 최종 입문기
(11/09/2011; 10/30/2011;)
공 병우 박사님은 자신의 40년에 걸친 한글 기계화 기술과 깊은 사랑을 담아 1990년대 중반 셈틀 입력기 표준으로 세벌식 최종을 발표했다. 셈틀에서 한글 입력의 꽃은 세벌식 최종이란 생각이다.
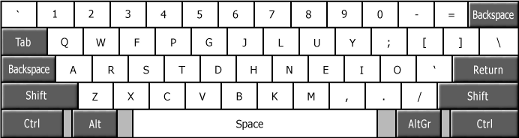
글쓴이도 다른 사람들처럼 두벌식을 배워 20년 넘게 사용해왔다. 그런데 최근 관심을 두기 시작한 우리말과 한글로 지난주에 두벌식을 버리고 세벌식을 배우기로 했다. 리눅스에서는 시스템 입력기인 IBus가 세벌식을 지원한다. 그러나 세벌식 타자연습 프로그램은 없어서 윈도우용 날개셋 타자 연습기를 사용했다.(http://moogi.new21.org/prg5.html) 한컴의 타자연습기는 한글 윈도우즈 XP에서는 실행이 된다. 세벌식 학습도 포함되어 있다. 이 프로그램의 기능을 전부 살펴보지는 않았다. 아래는 세벌식 최종 자판 모습이다.
국내에서 세벌식 한글 자판은 구할 수 없다. 세벌식 자판을 모두 암기할 때까지는 자판 이미지를 인쇄해서 가로 20cm, 세로 7cm 크기로 잘라 모니터 위에 붙이고 참조하면 된다.
IBus를 한글/영어 입력기로 사용하면 세벌식 전환은 IBus 메뉴에서 세벌식 최종을 선택하면 된다.
글쓴이가 세벌식으로 옮긴 이유는 다음과 같다. 한글은 초성, 중성, 종성을 글자 생성 원리를 가진 조합형 음소 문자이다. 세벌식은 이 원리를 적용하고 있다.
300타 이상 두벌식 속도가 나오는 사용자에게 세벌식 전환은 맨땅에서 다시 시작하는 것과 같다. 분당 300타에서 걸음마 수준인 분당 20타로 세벌식을 배울 때의 답답함을 견디기는 힘이 들었다. 꾸준히 연습해 자판을 모두 외우고 30타, 40타 속도가 늘어나는 재미로 두벌식의 유혹을 이겨냈다. 80타를 넘으면 인터넷 게시판에 글을 쓸 수 있고, 장문의 문서 작업도 가능해진다.
세벌식으로 한글을 입력하면 리듬을 느끼게 된다. 마치 피아노 연주처럼 부드럽게 한글을 입력할 수 있다. 모든 단어는 오른손의 초성에서 시작해 왼손의 중성(모음)이나 종성(자음인 받침)으로 끝이 난다.
특히 낱말 최소 단위에서 이루어지는 모아치기는 감동 그 자체로 직접 경험을 해봐야 세벌식 입력기의 뛰어남을 알 수 있다. 예를 들면, '한'은 'ㅎ + ㅏ + ㄴ' 세 글자로 이루어져 있다. 초성 -> 중성 -> 종성을 정확히 입력해야 '한'이 써진다. 두벌식의 원리이고 손으로 쓸 때도 똑같다. 실수한 글자는 지우고 새로 써야 한다. 모아치기는 이 글쓰기 실수를 자동으로 해결해 준다!! 한글의 입력 순서에 관계없이 초성, 중성, 종성만 입력하면 글자가 만들어진다. 'ㅎ+ ㄴ + ㅏ'를 치면 '한'을 만들고 'ㅏ+ ㅎ + ㄴ'도 '한'이 된다. 고속 입력에서 이 모아치기는 빛을 바란다. 단어 입력 단계에서 오류 고침.
민중을 위해 한글을 만든 세종 대왕님
한글의 원리에 맞게 세벌식을 만든 공 병우 박사님
리눅스에서 한글 세벌식 입력 기능을 구현한 이름모를 개발자님들
날개셋 타자 연습기를 만든 김 용욱님
모두에게 고마움을 전한다.
Devuan 1.0 (Debian without systemd)
amd64 station: AMD FX(tm)-6100 Six-Core Processor, 8 GB memory, 1 TB HDD
amd64 laptop: HP Touchsmart
글쇠판: 세벌 최종식, 콜맥 (Colemak)
리눅스 키캡
(11/03/2011;)
2년 전에는 6개에 $14.50
현재는 2개에 $11
Devuan 1.0 (Debian without systemd)
amd64 station: AMD FX(tm)-6100 Six-Core Processor, 8 GB memory, 1 TB HDD
amd64 laptop: HP Touchsmart
글쇠판: 세벌 최종식, 콜맥 (Colemak)
윈도우즈 XP USB 드라이브 읽고 쓰도록 마운트
apt-get install libfuse2
apt-get install ntfs-3g
http://beginlinux.wordpress.com/2009/03/18/mounting-an-ntfs-drive-in-debian/
Devuan 1.0 (Debian without systemd)
amd64 station: AMD FX(tm)-6100 Six-Core Processor, 8 GB memory, 1 TB HDD
amd64 laptop: HP Touchsmart
글쇠판: 세벌 최종식, 콜맥 (Colemak)
전력 (power) 사용 상태, 조정 프로그램
설치는 sudo aptitude powertop
사용법은 sudo powertop으로 터미널에서 시스템의 전력 사용 상태에 관한 여러 정보를 보고, Tunables
메뉴에 가서 Bad로 나온 장치들을 Good으로 바꿀 수 있다.
전력 사용 상태를 파일로 아래와 같이 HTML나 cvs 파일을 지정해 준다.
$ sudo powertop --html=/tmp/pt-report1.html
시스템의 전체 전력 사용량을 실시간으로 알려주고 제한하는 프로그램 pwrkap이 있다.
pwrkap, pwrkap-gui를 설치하면 된다.
/etc/init.d/pwrkap을 실행하면 데몬 서비스가 시작된다.
전력 사용량을 그래프로 보려면 pwrkap_gtk를 일반 사용자로 실행시킨다.
CPU 온도와 팬 속력같은 정보를 보여주는 꾸러미가 lm-sensors가 있다.
sensors를 일반 사용자로 실행하면 아래와 같은 정보를 보여준다.
$ sensors atk0110-acpi-0 Adapter: ACPI interface Vcore Voltage: +0.95 V (min = +0.80 V, max = +1.60 V) +3.3V Voltage: +3.30 V (min = +2.97 V, max = +3.63 V) +5V Voltage: +5.10 V (min = +4.50 V, max = +5.50 V) +12V Voltage: +12.24 V (min = +10.20 V, max = +13.80 V) CPU Fan Speed: 2428 RPM (min = 600 RPM, max = 7200 RPM) Chassis Fan Speed: 2089 RPM (min = 600 RPM, max = 7200 RPM) CPU Temperature: +35.0°C (high = +60.0°C, crit = +95.0°C) MB Temperature: +37.0°C (high = +45.0°C, crit = +75.0°C) k10temp-pci-00c3 Adapter: PCI adapter temp1: +16.4°C (high = +70.0°C) (crit = +83.5°C, hyst = +80.5°C) fam15h_power-pci-00c4 Adapter: PCI adapter power1: 31.00 W (crit = 95.01 W)Devuan 1.0 (Debian without systemd)
amd64 station: AMD FX(tm)-6100 Six-Core Processor, 8 GB memory, 1 TB HDD
amd64 laptop: HP Touchsmart
글쇠판: 세벌 최종식, 콜맥 (Colemak)
데비안 지금 최신 버전은 10.9
데비안 관련 검색하다 여기까지 왔네요. 오래된 얘기지만 지금도 쓸만한 얘기도 많네요.
지금 최신 버전은 10.9
https://www.debian.org/News/2021/20210327
세벌 https://sebuls.blogspot.kr/
댓글 달기